User Management, Agent Management in Znuny and OTOBO
The successful integration and management of agents in your OTOBO is an essential component for the smooth operation of your Service Desk. This article takes a closer look at the effective management of agents in OTOBO, a leading helpdesk and ticketing system that offers flexibility and comprehensive customization options.
OTOBO, as a modern and powerful ticket system, allows you to efficiently manage agents within the system via various backends. With the ability to use up to ten backend sources, OTOBO helps you maintain a precise and clean permission system in your ticket system.
Adding and Managing Agents
To use the Service Desk effectively, you should be able to add new agents and adjust existing agent accounts as needed. The following steps guide you through the agent management process, right after setting up your OTOBO:
Adding Agents
Use the Agents section within the Users, Groups & Roles group to add new agents to the system. OTOBO allows you to manage agent settings centrally, which is particularly useful for quickly responding to security issues or other urgent situations.
Editing and Deactivating Agents
Within the agent management area, agent accounts can be edited or deactivated as needed by adjusting their validity accordingly. This is an important function for controlling and managing access to the system.
Searching for Agents
With the integrated search function, you can easily search for specific agents and adjust their profiles or settings. This feature is especially helpful in large organizations with many agents.
Permissions and Roles
In OTOBO, an agent's permissions can be defined through assignments to specific groups or roles. These permission configurations allow you to create a detailed and effective access control system within your helpdesk system.
Customizing Personal Settings
In addition to basic access permissions, you can also define personal preferences and settings for each agent to create an individual work environment. This can include: language, notification settings, and other personal customizations.
Integrations and Interfaces
OTOBO offers extensive integrations and interfaces, allowing it to be seamlessly integrated into existing IT infrastructures. Some examples include LDAP connection, Docker, and the ability to integrate with other systems like i-doit or Power BI for advanced reports and statistics.
Furthermore, OTOBO offers further customization options through add-ons and extensions to meet specific business needs. Whether you want to integrate artificial intelligence (AI) to improve your customer service or need advanced Business Intelligence (BI) functions, OTOBO is designed to adapt to the unique requirements of your company.
Important Agent Settings
 for agent widget](https://softoft.sirv.com/Images/otobo/docs/agent-effective-permission) Effective permissions for agent widget [1]
Effective permissions for agent widget [1]When adding or editing an agent in your OTOBO system, the following settings are of particular importance:
- First Name, Last Name, Username, Email: These details are mandatory to uniquely identify the agent in the system and grant them access.
- Title or Salutation: A formal salutation, such as Mr., Dr., or Jr., can be added here.
- Validity: This option determines whether an agent account is active or inactive. To control access precisely, agents can be set to invalid or temporarily invalid.
A useful tip: The agent's display name can be individually customized via the system configuration setting FirstnameLastnameOrder.
Integration of Backend Sources
OTOBO not only allows the integration of agent information from an internal database but also enables reading and synchronizing agent data from other sources such as an Active Directory® or an LDAP Server. For companies that require a robust integration into their existing IT landscape, this represents a significant added value.
Authentication Backends with LDAP
For connecting to an LDAP or Active Directory server, OTOBO offers flexible configuration options. To configure this, copy the required configuration block from Defaults.pm and paste it into your Config.pm. The configuration must include, among other things, the host, the base DN, and the UID for the LDAP server. Other specific adjustments, such as requiring membership in a special group for access to OTOBO, can also be set.
LDAP provides a standardized method for using directory services like Microsoft Active Directory or OpenLDAP for the authentication and synchronization of agent data. Integrating LDAP into OTOBO allows for centralizing and simplifying user management, which is particularly advantageous for organizations with a large number of agents and users.
Basics of LDAP Integration
First, you need the basic settings that define the connection to your LDAP server. This information includes:
- Host: The DNS name or IP address of your LDAP server.
- BaseDN: The starting point in the directory tree from which to search.
- UID: The attribute for user login and identification, e.g.,
sAMAccountNamefor Active Directory.
Here is a simple example of an LDAP configuration in OTOBO:
$Self->{AuthModule} = 'Kernel::System::Auth::LDAP';
$Self->{'AuthModule::LDAP::Host'} = 'ldap.example.com';
$Self->{'AuthModule::LDAP::BaseDN'} = 'dc=example,dc=com';
$Self->{'AuthModule::LDAP::UID'} = 'uid';
Advanced LDAP Settings:
For more specific requirements, you can adjust other LDAP parameters:
- UserLowerCase: Useful if queries are case-insensitive, to avoid duplicate synchronizations.
- Charset: Defines the character set, possibly for converting UTF-8 data from LDAP to ISO-8859-1.
- LDAP::Params: Other parameters like port, timeout, etc.
Example of advanced settings:
$Self->{'AuthModule::LDAP::UserLowerCase'} = 0;
$Self->{'AuthModule::LDAP::Charset'} = 'iso-8859-1';
$Self->{'AuthModule::LDAP::Params'} = {
    port    => 389,
    timeout => 120,
    async   => 0,
    version => 3,
};
Using Multiple LDAP Backends
OTOBO allows setting up multiple authentication and synchronization backends. This can be achieved by adding additional configuration sections with unique numeric identifiers:
$Self->{AuthModule1} = 'Kernel::System::Auth::LDAP';
$Self->{'AuthModule::LDAP::Host1'} = 'ldap.example.com';
...
$Self->{'AuthModule::UseSyncBackend1'} = 'AuthSyncBackend1';
Automatic Synchronization of Agent User Data
To avoid manually adding agents to the user table, OTOBO offers the option to automatically synchronize agent data upon login. This helps to efficiently manage access and role assignment for new and existing agents.
Conclusion
Integrating an LDAP permission system into your OTOBO helpdesk software not only increases security but also the efficiency of user management. By automating agent authentication and synchronization, you can significantly reduce administrative overhead while improving user-friendliness for your Service Desk agents. Synchronizing agent data via LDAP into your OTOBO is a key feature that significantly simplifies user management. This enables efficient management of agent access and central control over permissions and roles. Using the LDAP synchronization feature particularly facilitates the automation of user management in large organizations.
LDAP-based Synchronization in OTOBO
The procedure for setting up LDAP-based synchronization involves configuring the AuthSyncModule in the Config.pm file of your OTOBO system. The minimum requirements for this include defining the LDAP host, the BaseDN, and the UID attribute, which is used for user login and identification.
Basic Setup for LDAP Synchronization:
$Self->{AuthSyncModule} = 'Kernel::System::Auth::Sync::LDAP';
$Self->{'AuthSyncModule::LDAP::Host'} = 'ldap.example.com';
$Self->{'AuthSyncModule::LDAP::BaseDN'} = 'dc=example,dc=com';
$Self->{'AuthSyncModule::LDAP::UID'} = 'uid';Host: DNS name or IP address of your LDAP server.BaseDN: Starting point in the directory tree.UID: Identification attribute for the user (e.g.,sAMAccountNamefor Active Directory).
Advanced Configuration Options:
For special requirements, OTOBO offers advanced LDAP synchronization features, such as defining an AlwaysFilter to precisely filter specific requests to the LDAP server. The UserSyncMap allows for detailed control over how LDAP field data is transferred to OTOBO database fields:
$Self->{'AuthSyncModule::LDAP::UserSyncMap'} = {
    UserFirstname => 'givenName',
    UserLastname  => 'sn',
    UserEmail     => 'mail',
};
Integration of Agent Groups and Roles:
The integration of agent groups and roles gives you the ability to automatically assign users to corresponding groups and roles within OTOBO after synchronization. This is based on the security objects of the directory server:
## Configuration blocks to be changed for groups and rolesImportant Notes:
- Multiple AuthSyncModule configurations allow the simultaneous use of multiple LDAP servers.
- Groups and roles must exist in OTOBO before you can use the synchronization feature.
Best Practices for Managing Agent Permissions
The efficient management of agent groups and roles in OTOBO is crucial for a secure and orderly access control. By assigning agents to specific groups , you can precisely control their access permissions and adapt them to new requirements at any time.
Summary
LDAP synchronization ensures that agent data is always up-to-date and that permissions can be managed centrally. With the flexible configuration options of OTOBO, you can create a robust and secure framework for your helpdesk software, thereby significantly optimizing the management of agent access and roles. Managing agent-group relationships is a central aspect of effective Service Desk Management. OTOBO provides an intuitive and flexible platform that allows administrators to quickly and efficiently assign agents or employees to groups to control the corresponding permissions and access to tickets and other resources. This article guides you through the process of assigning agents to groups and vice versa, a key functionality in your helpdesk and ticketing system.
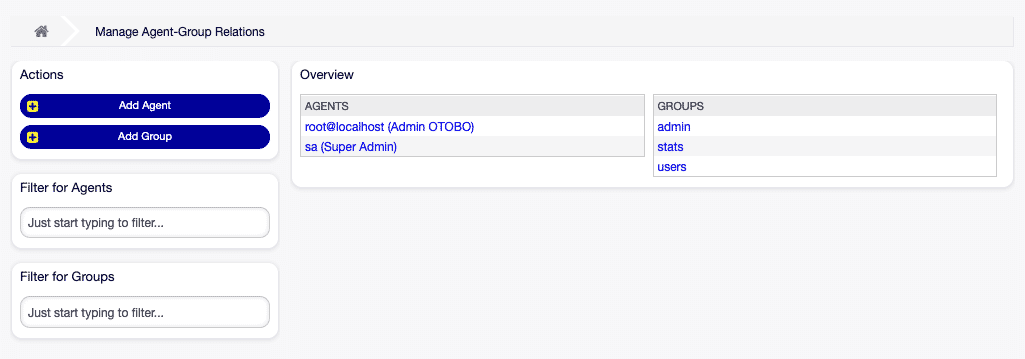 Manage agent-group relationships [1]
How to Manage Agent ↔ Group Relationships in OTOBO
To assign groups to an agent:
- Select the relevant agent in the Agents column.
- Select the desired permissions to link the agent with the corresponding groups.
- Confirm your selection by clicking the Save or Save and finish button.
 Change group relationships for agent [1]
To assign agents to a group:
- Click on the desired group in the Groups column.
- Select the permissions you want to use to connect this group with agents.
- Confirm the assignment by clicking the Save or Save and finish button.
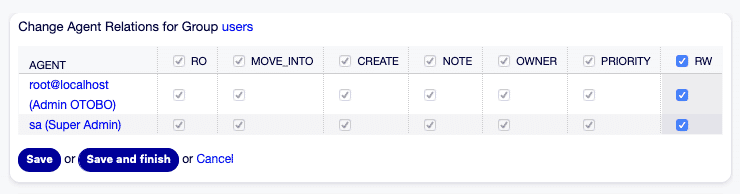 Change agent relationships for group [1]
Useful Tips:
- Use the filter field to find specific agents or groups more quickly if your system contains many entries.
- It is possible to assign multiple agents or groups at the same time, which simplifies administration.
Understanding Permissions
When assigning agents to groups, you have the option to choose between different permission levels:
- ro: Read-only access
- move_into: Permission to move tickets
- erstellen: Creation of new tickets
- notiz: Adding notes to tickets
- besitzer: Changing the ticket owner
- priorität: Adjusting the ticket priority
- rw: Full read and write access
- And other specific permissions like chat_teilnehmer, chat_besitzer, chat_beobachter
Extra Tip: Check the System::Permission setting in OTOBO for additional permissions that might suit your needs, such as statistiken, bounce, komponieren, kunde, weiterleiten, etc. These additional permissions expand the functionality and control you have over the tickets and workflows in your OTOBO ticket system.
Conclusion
The flexible management of agent-group relationships is a key feature of OTOBO and contributes significantly to creating a structured and efficient work environment within your Service Desk. By correctly assigning permissions, you ensure that every agent has the necessary access and functions for productive work, which ultimately leads to increased customer satisfaction. In the dynamic environment of a Service Desk, it is crucial to efficiently assign agents not only to groups but also to specific roles. OTOBO, the modern successor to the OTRS Community Edition, allows you to make these assignments intuitively and effectively. Roles serve as carriers of pre-configured permission sets that are tailored to the requirements of specific functions within your company. This guide walks you through the process of assigning agents to roles and vice versa, which is another key element of your efficient helpdesk and ticketing system.
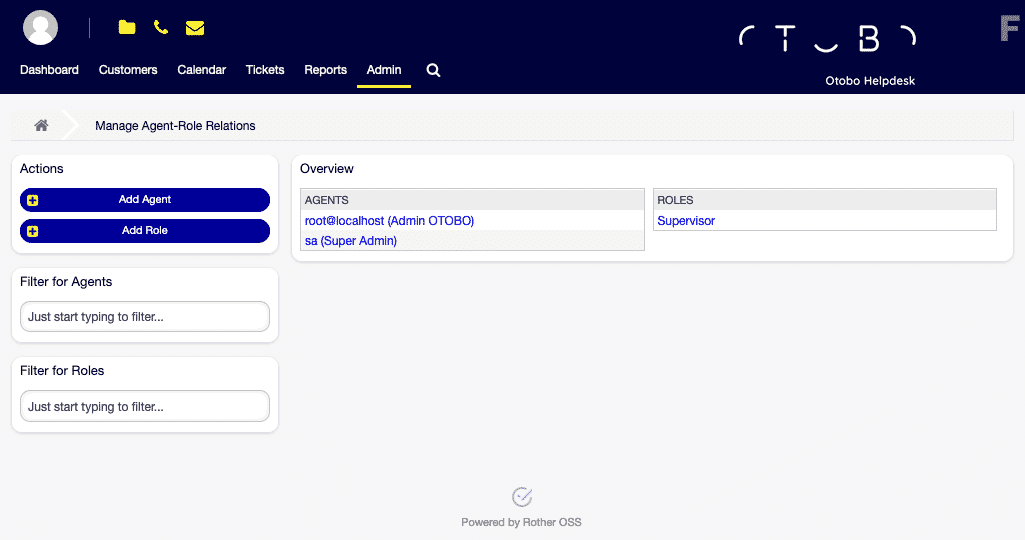 Manage agent-role relationships [1]
Managing Agent ↔ Roles
Assigning Roles to an Agent
- Navigate to the Agent in the Agents column.
- Select the desired roles to be assigned to the agent.
- Confirm the assignment by clicking the Save or Save and finish button.
 Change role relationships for agent [1]
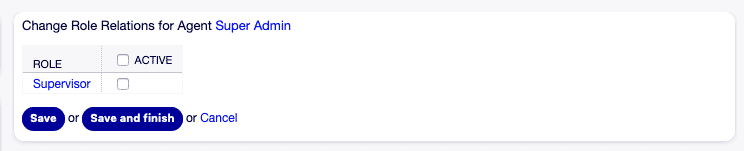
Assigning Agents to a Role:
- Select the desired role in the Roles column.
- Select the agents to be added to this role.
- Click Save or Save and finish to complete the change.
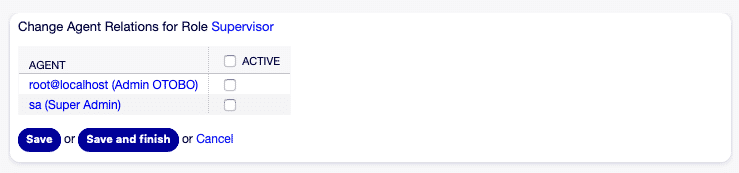 Change agent relationships for role [1]
Useful Tips
- To quickly find specific agents or roles, use the filter field by simply typing the name.
- Note that you can assign multiple agents or roles at the same time, which minimizes administrative effort.
Further Notes
- Ease of Use: Ticking a checkbox in the header of a category column selects all checkboxes in that category.
- Return: Note that accessing agent or role editing does not allow a direct return to the previous screen. It is recommended to plan your navigation accordingly.
- Activation: Ticking the checkbox in the header of the Active column selects all checkboxes in that column.
Importance of Assigning Roles
The effective use of roles for permission management significantly increases the efficiency and security of your helpdesk software. By adding specific permission sets to roles, you can:
- Quickly equip agents with the necessary permissions.
- Reduce the effort of individual permission assignment.
- Create clearly defined permissions for specific task areas within your ticket system.
Conclusion
Assigning agents to specific roles is a critical aspect of operating an efficient and secure Service Desk. OTOBO provides you with the flexibility and functionalities needed to perform these assignments with just a few clicks. This functionality helps you increase productivity and ensure that every agent has the right tools and permissions to perform their tasks effectively.