OTOBO - Schnittstellen
This content is not available in your language yet.
OTOBO - Schnittstellen
Abschnitt betitelt „OTOBO - Schnittstellen“::: note Disambiguierung In diesem Artikel geht es um graphische Schnittstellen und nicht um Programmierschnittstellen. Falls Sie Informationen zu Programmierschnittstellen suchen, lesen Sie stattdessen:
Sowie Integration von Agenten und Kunden:
- OTOBO Agenten Integration(LDAP und DB).
- OTOBO Kunden(Firmen) Integration(LDAP und DB).
- OTOBO Kunden Benutzer Integration(LDAP und DB). :::
Die Verwendung externer Schnittstellen im OTOBO Ticket-System ist unerlässlich für eine effiziente und effektive Kommunikation zwischen Ihrem Service-Desk und Ihren Nutzern. OTOBO ist nicht nur ein fortschrittliches Open-Source-Helpdesk- und Ticketsystem, sondern bietet auch vielfältige Möglichkeiten zur Integration und Anpassung. Von der Kundensupport-Erleichterung durch das OTOBO Customer Portal bis hin zur Effizienzsteigerung durch OTOBO Managed Services, die Palette der Einsatzmöglichkeiten ist umfangreich.
:::warning In Entwicklung Einige der gezeigten Funktionen werden erst in zukünftigen OTOBO Versionen freigeschaltet! :::
OTOBO Integration mit anderen Systemen
Abschnitt betitelt „OTOBO Integration mit anderen Systemen“In Zeiten der Digitalisierung ist eine dynamische und benutzerfreundliche Service-Desk-Lösung unabdingbar. OTOBO bietet hierfür eine Plattform, die nicht nur durch ihre einfache Einrichtung besticht (siehe “OTOBO Einrichten”), sondern auch umfangreiche Anpassungsmöglichkeiten für Ihre Unternehmensidentität (siehe “OTOBO Anpassung”) bietet. Die OTOBO Schnittstelle ermöglicht eine nahtlose Integration in bestehende Systeme (siehe “OTOBO Integration”) und erleichtet die Verwaltung von Serviceanfragen.
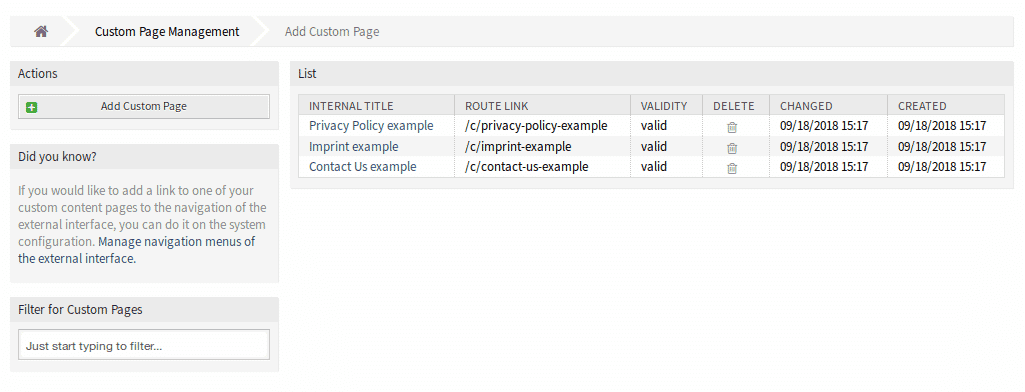
Verwaltung benutzerdefinierter Seiten
Abschnitt betitelt „Verwaltung benutzerdefinierter Seiten“Verwenden Sie die Möglichkeit, benutzerdefinierte Seiten im OTOBO Ticketsystem zu erstellen, um Ihre externe Schnittstelle individuell zu gestalten. OTOBO ermöglicht es Ihnen, auf einfache Weise benutzerdefinierte Seiten hinzuzufügen und zu verwalten, was eine wertvolle Ressource für die Bereitstellung von Informationen wie Servicekatalog und Wissensdatenbank darstellt.
Hinzufügen benutzerdefinierter Seiten
Abschnitt betitelt „Hinzufügen benutzerdefinierter Seiten“Um eine neue benutzerdefinierte Seite zu Ihrem OTOBO System hinzuzufügen:
- Wählen Sie die Option “Benutzerdefinierte Seite hinzufügen”.
- Befüllen Sie die erforderlichen Felder mit Ihren Inhalten.
- Speichern Sie Ihre Eingaben, um die neue Seite dem System hinzuzufügen.
Bearbeiten & Löschen benutzerdefinierter Seiten
Abschnitt betitelt „Bearbeiten & Löschen benutzerdefinierter Seiten“Zum Bearbeiten oder Löschen bestehender Seiten, navigieren Sie durch die Übersicht Ihrer benutzerdefinierten Seiten. Über die Optionen “Bearbeiten” und “Löschen” können Sie Anpassungen vornehmen oder Seiten entfernen.
Vorteile der OTOBO Schnittstellen
Abschnitt betitelt „Vorteile der OTOBO Schnittstellen“Durch die Nutzung der OTOBO Schnittstellen können Ihre Service-Desk-Anfragen effizienter bearbeitet werden, während Sie gleichzeitig eine solide Unternehmensidentität aufbauen. OTOBO’s flexible Konfigurationsoptionen bieten zudem umfangreiche Möglichkeiten zur Anpassung und Erweiterung Ihres Systems (siehe “OTOBO Erweiterung”, “OTOBO Add-ons”).
Investieren Sie in OTOBO Schnittstellen, um die Kommunikationswege Ihres Unternehmens zu optimieren. Entdecken Sie die zahlreichen OTOBO Funktionen und ihr Potenzial für die Verbesserung Ihres Service-Desks.
Konfiguration Benutzerdefinierter Seiten
Abschnitt betitelt „Konfiguration Benutzerdefinierter Seiten“Beim Hinzufügen oder Bearbeiten benutzerdefinierter Seiten im OTOBO Ticketsystem, gibt es spezifische Felder, die Aufmerksamkeit benötigen. Diese Felder ermöglichen eine tiefe Anpassung und sorgen dafür, dass jede Seite genau Ihren Bedürfnissen und den Anforderungen Ihrer Nutzer entspricht.
**Interner Titel* **
Der interne Titel ist für die Verwaltung im Backend wesentlich. Er wird genutzt, um Ihre benutzerdefinierte Seite leicht
in der Oberfläche zu identifizieren. Obwohl dieses Feld flexibel Zeichen, inklusive Leerzeichen und Großbuchstaben
akzeptiert, ist es empfehlenswert, einen klaren und beschreibenden Titel zu wählen.
**Slug* **
Der Slug definiert den URL-Pfad Ihrer benutzerdefinierten Seite. Für eine bessere SEO-Performance und
Nutzerfreundlichkeit sollten Sie hier niedergeschriebene Buchstaben, Zahlen und Minuszeichen anstelle von Leerzeichen
verwenden.
**Gültigkeit* **
Ein essentielles Feld zur Steuerung der Aktivierung Ihrer Seite. Nur Seiten, die als gültig markiert sind, können von
Nutzern gesehen und erreicht werden. Durch die Einstellung auf ungültig oder vorübergehend ungültig, wird die Seite
deaktiviert, bleibt jedoch im System erhalten.
Inhalt der benutzerdefinierten Seite
Der Hauptbereich, um Ihre Seite mit Leben zu füllen. Sie können sowohl den Titel als auch den Inhalt der Seite in der
von Ihnen gewünschten Sprache einfügen. Um mehrere Sprachversionen Ihrer Seite zu unterstützen,
ermöglicht OTOBO das
einfache Hinzufügen von neuem benutzerdefinierten Seiteninhalt für verschiedene Sprachen.
:::warning In Entwicklung Einige der gezeigten Funktionen werden erst in zukünftigen OTOBO Versionen freigeschaltet! :::
Verwaltung der Startseite
Abschnitt betitelt „Verwaltung der Startseite“Die Startseite Ihrer OTOBO-basierten Plattform dient als Schaufenster für Ihre Nutzer. Nutzen Sie die Startseitenkonfiguration, um einen starken ersten Eindruck zu hinterlassen und wichtige Informationen sofort zugänglich zu machen.
Design der Hero Unit
Abschnitt betitelt „Design der Hero Unit“Die Hero Unit ist ein zentraler Bestandteil des Designs Ihrer Startseite. Mit einem aussagekräftigen Titel, einem ansprechenden Hintergrundbild oder -farbe und der Möglichkeit, Bild und Farbe zu überlagern, können Sie eine visuell ansprechende Begrüßung für Ihre Nutzer schaffen.
Ticketliste
Ein optionaler Bereich, um angemeldeten Benutzern die neuesten oder
relevantesten Tickets direkt auf der Startseite
anzeigen zu lassen. Die Anzeige dieser Liste ist konfigurierbar und kann anhand Ihrer Präferenzen aktiviert oder
deaktiviert werden.
Bild-Teaser
Abschnitt betitelt „Bild-Teaser“Bild-Teaser sind eine weitere Methode, um die Aufmerksamkeit der Nutzer auf wichtige Themen oder Aktionen zu lenken. Platziert in einer separaten Reihe, bieten sie die Möglichkeit, visuelle Highlights auf Ihrer Startseite zu setzen.
Indem Sie die Möglichkeiten der Anpassung von benutzerdefinierten Seiten und der Startseite in OTOBO nutzen, können Sie eine Plattform schaffen, die nicht nur funktional, sondern auch visuell und inhaltlich auf Ihr Unternehmen zugeschnitten ist.
Anpassung der Startseite mit Bild-Teasern & Linklisten
Abschnitt betitelt „Anpassung der Startseite mit Bild-Teasern & Linklisten“Das Design Ihrer Startseite ist das Aushängeschild Ihrer OTOBO-basierten Plattform. Es bietet den ersten Eindruck und führt Nutzer zu wichtigen Ressourcen. Bild-Teaser und Linklisten sind kraftvolle Tools, mit denen Sie Ihre externe Schnittstelle optimieren und zugänglich machen können.
Gestaltung von Bild-Teasern
Abschnitt betitelt „Gestaltung von Bild-Teasern“Bild-Teaser ziehen die Aufmerksamkeit auf spezifische Themen oder Aktionen und bieten eine visuell ansprechende Methode, wichtige Aspekte Ihrer Plattform hervorzuheben.
So fügen Sie Bild-Teaser hinzu:
Abschnitt betitelt „So fügen Sie Bild-Teaser hinzu:“- Gehen Sie zur oberen rechten Ecke des Bild-Teaser-Widgets und klicken Sie auf “Hinzufügen”.
- Wählen Sie ein passendes Bild, das die Botschaft Ihres Teasers unterstützt.
- Geben Sie einen aussagekräftigen Titel und einen ergänzenden Text ein.
- Definieren Sie das Linkziel für Nutzer, die mehr erfahren möchten.
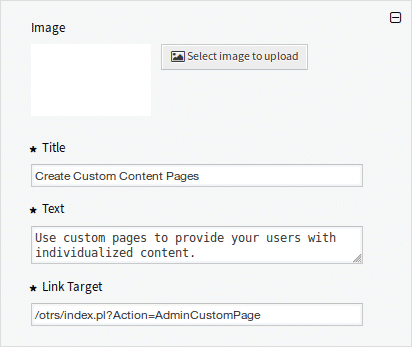
Beachten Sie, dass Farben und Titel ebenfalls anpassbar sind, um eine harmonische Gesamtästhetik Ihrer Webseite zu gewährleisten.
:::warning In Entwicklung Einige der gezeigten Funktionen werden erst in zukünftigen OTOBO Versionen freigeschaltet! :::
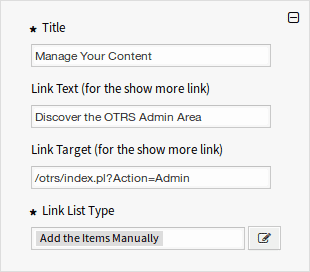
Einrichtung von Linklisten
Abschnitt betitelt „Einrichtung von Linklisten“Linklisten bieten die Möglichkeit, relevante Ressourcen strukturiert und nutzerfreundlich darzustellen. Sie sind essenziell für eine informative und effiziente Navigation.
So richten Sie Linklisten ein:
Abschnitt betitelt „So richten Sie Linklisten ein:“- Wählen Sie “Hinzufügen” in der oberen rechten Ecke des Linklisten-Widgets.
- Geben Sie einen prägnanten Titel für die Linkliste an.
- Definieren Sie den Linktext und das Ziel, um Detailseiten oder externe Ressourcen zu verknüpfen.
- Entscheiden Sie zwischen manueller Hinzufügung von Elementen oder der Anzeige von Suchergebnissen.
Bei beiden Optionen - Bild-Teaser und Linklisten - empfiehlt sich eine strategische Planung, um sicherzustellen, dass die Inhalte nicht nur ästhetisch ansprechend, sondern auch funktional und für den Nutzer wertvoll sind.
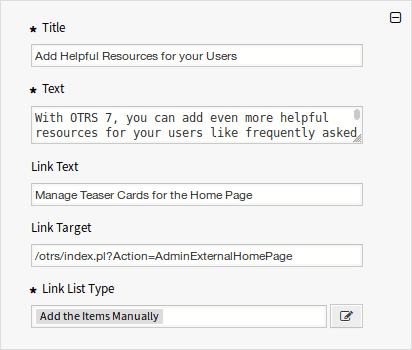
Inhaltskarten: Ein weiteres Gestaltungselement
Abschnitt betitelt „Inhaltskarten: Ein weiteres Gestaltungselement“Inhaltskarten sind ähnlich wie Bild-Teaser und Linklisten ein hilfreiches Element, um Ihre Service-Angebote und Informationen hervorzuheben. Sie können bis zu drei Inhaltskarten hinzufügen, jedes mit einem eigenständigen Titel, Text und Link für “mehr anzeigen”.
Die korrekte Nutzung dieser Elemente trägt nicht nur zu einer lebendigen und ansprechenden Startseite bei, sondern erleichtert auch Ihren Website-Besuchern die Navigation und das Auffinden von Informationen.
Hinweis für zukünftige Updates
Abschnitt betitelt „Hinweis für zukünftige Updates“Während die oben beschriebenen Funktionen bereits eine vielseitige Anpassung ermöglichen, ist es wichtig im Blick zu behalten, dass OTOBO kontinuierlich weiterentwickelt wird. Zukünftige Versionen werden voraussichtlich weitere Anpassungsmöglichkeiten und Funktionen bieten. Bleiben Sie also auf dem Laufenden und sehen Sie regelmäßig nach Updates und neuen Features, um Ihre Plattform weiter zu verbessern.
Personalisierung der Externen Schnittstelle in OTOBO: Ein umfassender Leitfaden
Abschnitt betitelt „Personalisierung der Externen Schnittstelle in OTOBO: Ein umfassender Leitfaden“Die äußere Erscheinung und das Gefühl Ihrer OTOBO-basierten Plattform spielen eine entscheidende Rolle dabei, wie Benutzer mit Ihrem Service-Desk interagieren. Durch die Anpassung des Layouts können Sie nicht nur die Markenidentität stärken, sondern auch die Benutzerfreundlichkeit verbessern. Hier erfahren Sie, wie Sie die externe Schnittstelle mithilfe des Layout-Moduls individuell gestalten können.
Ändern des Standardlayouts
Abschnitt betitelt „Ändern des Standardlayouts“Eine neue Installation von OTOBO verfügt bereits über ein ansprechendes Standardlayout. Jedoch können Sie alle Aspekte des Designs gemäß Ihren Branding-Richtlinien modifizieren, um eine einzigartige Nutzeroberfläche zu schaffen.
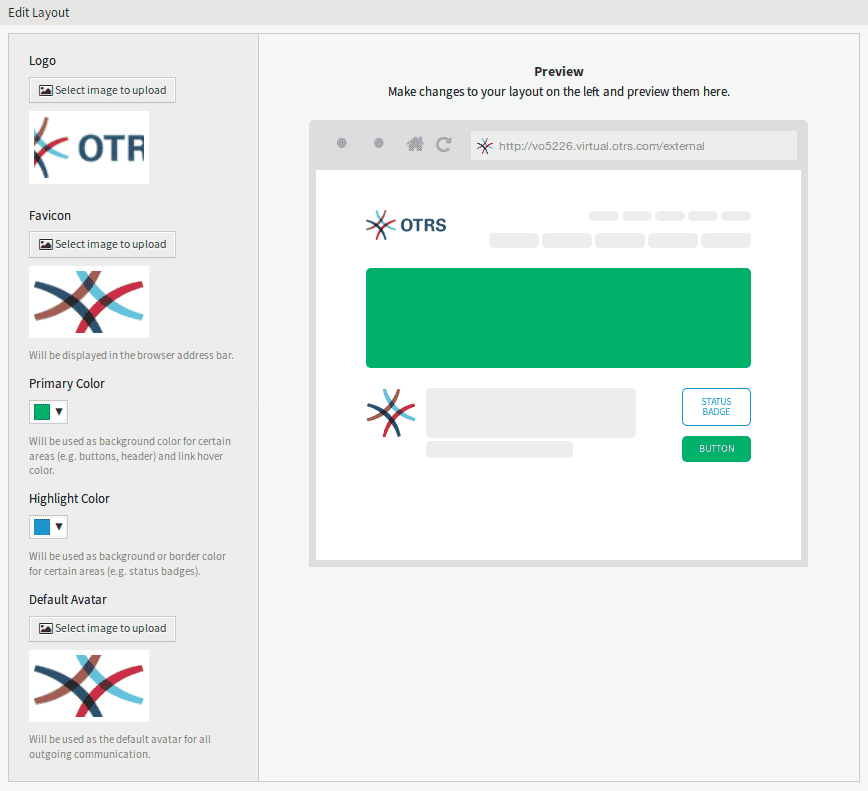
Wesentliche Layout-Elemente
Abschnitt betitelt „Wesentliche Layout-Elemente“Logo: Ein markantes Logo an der oberen linken Ecke verstärkt Ihre Markenpräsenz. Es ist empfehlenswert, ein PNG-Bild zu verwenden, das klar und erkennbar ist.
Favicon: Das Favicon ist das kleine Bild, das in der URL-Leiste des Browsers erscheint. Ein gut gewähltes Favicon erhöht die Wiedererkennung Ihrer Plattform.
Primärfarbe und Akzentfarbe: Diese Farben sind zentral für das visuelle Erlebnis auf Ihren Seiten. Die Auswahl sollte Ihre Unternehmensfarben widerspiegeln und zur allgemeinen Ästhetik der Website beitragen.
Standard-Avatar: Ein einheitlicher Avatar bildet eine visuelle Kontinuität für alle ausgehenden Kommunikationen und verstärkt das Gemeinschaftsgefühl.
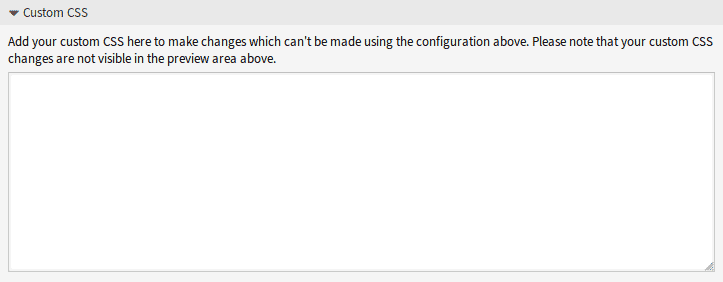
Eigenes CSS: Für tiefergehende Anpassungen können Sie eigenes CSS hinzufügen. Dies ermöglicht es Ihnen, nahezu jeden Aspekt der Benutzeroberfläche nach Ihren Wünschen zu gestalten.
Erweiterte Anpassungen mit eigenen Skripten
Abschnitt betitelt „Erweiterte Anpassungen mit eigenen Skripten“Um den Funktionsumfang Ihrer Plattform zu erweitern, können Sie eigene Skripte einbinden. Dies ist nützlich für integrierte Lösungen wie Chat-Services oder für Webanalysen.
Beispiel: Einbinden von Webanalyse-Tools
Abschnitt betitelt „Beispiel: Einbinden von Webanalyse-Tools“Das Einbinden externer Skripte, wie von Webanalyseanbietern bereitgestellte Code-Snippets, ermöglicht es Ihnen, das Benutzerverhalten zu verfolgen und zu analysieren. Diese Skripte können sicher in OTOBO eingefügt werden und liefern wertvolle Einblicke, die zur Optimierung der Nutzererfahrung beitragen.
Sicherheitsstandards
Abschnitt betitelt „Sicherheitsstandards“Die externe Schnittstelle von OTOBO setzt auf hohe Sicherheitsstandards und nutzt Content Security Policy ( CSP) Header, um zu gewährleisten, dass nur vertrauenswürdiger Code ausgeführt wird. Dieser Schutzmechanismus stellt sicher, dass, selbst wenn unerwarteter Code zum Client gelangt, dieser vom Browser nicht ausgeführt wird.
Konfiguration eigener Skripte
Abschnitt betitelt „Konfiguration eigener Skripte“Die Einbindung zusätzlicher Skripte in Ihre externe Schnittstelle kann folgendermaßen durchgeführt werden:
ExternalFrontend::ExternalScriptsfür externe Skripte.ExternalFrontend::InlineScriptsfür Inline-Skripte.WebApp::Server::AdditionalOriginszur Angabe von zusätzlichen Ursprüngen.
Diese Einstellungen finden Sie in den Systemkonfiguration`.
Zusammenfassung der Skripte-Einbindung
Abschnitt betitelt „Zusammenfassung der Skripte-Einbindung“Die Personalisierung des Layouts Ihrer OTOBO-Plattform ist ein effektiver Weg, um eine Brücke zwischen Ihrer Markenidentität und den Benutzern Ihres Service-Desks zu schlagen. Durch sorgfältige Anpassung von Designelementen und die Einbindung eigener Skripte können Sie eine maßgeschneiderte und sichere Benutzererfahrung bieten.
-
Whitelisten der externen Skriptressource:
- Navigieren Sie zum Bildschirm Systemkonfiguration.
- Suchen Sie nach der Einstellung
WebApp::Server::AdditionalOrigins. - Bearbeiten Sie diese Einstellung, um den Standort der externen Skriptressource hinzuzufügen (
z.B.
https://www.example.com).
-
Erlauben von Inline-Skripten und Evaluationen:
- Dies kann komplexer sein, da es möglicherweise erforderlich ist, die Content-Security-Policy-Einstellung des Webservers oder eines Proxy-Servers direkt zu ändern, um Inline-Skripte und ‘eval’-Operationen zu erlauben.
- Falls Ihre OTOBO-Installation Zugriff auf diese tieferen Webserver- oder Proxy-Server-Einstellungen erlaubt,
suchen Sie nach Optionen, um die
script-src-Richtlinie der CSP zu ändern undunsafe-inlinesowieunsafe-evalhinzuzufügen.
-
Nach dem Hinzufügen Änderungen anwenden:
- Speichern Sie alle geänderten Einstellungen und sorgen Sie dafür, dass die neue Systemkonfiguration in Kraft gesetzt wird.
- Führen Sie den Befehl
bin/otobo.WebServer.pl --deploy-assetserneut aus, um sicherzustellen, dass alle Assets richtig neu bereitgestellt und die Änderungen angewandt werden.
Überprüfung der Änderungen
Abschnitt betitelt „Überprüfung der Änderungen“Nach dem Vornehmen dieser Änderungen und dem Neuaufbau der externen Schnittstellenanwendung sollten Sie Ihre Webseite erneut laden und prüfen, ob die externen und inline Skripte nun korrekt geladen und ausgeführt werden.
Sicherheitshinweise:
Abschnitt betitelt „Sicherheitshinweise:“- Es ist wichtig zu beachten, dass das Hinzufügen von
unsafe-inlineundunsafe-evalzu Ihrer CSP die Sicherheit Ihrer Web-Anwendung potenziell verringern kann, da dies die Möglichkeit für Cross-Site Scripting (XSS) Angriffe erweitert. Stellen Sie sicher, dass Sie diese Änderungen nur für vertrauenswürdige Skriptquellen vornehmen. - Die Whitelistung externer Quellen in CSP ist eine leistungsstarke Funktion, die hilft, die Sicherheit zu wahren, indem sichergestellt wird, dass nur Inhalte aus vertrauenswürdigen Quellen geladen werden. Jede Hinzufügung sollte sorgfältig geprüft werden.
Das Einbinden externer Skriptressourcen und das Hinzufügen von Inline-Code zu OTOBO bedarf sorgfältiger Planung und Konfiguration, insbesondere unter Berücksichtigung der Sicherheitsaspekte. Durch das folgsame Umsetzen der obigen Schritte können Sie die Funktionalität Ihres OTOBO-Service-Desks erweitern, ohne die Sicherheit Ihrer Nutzer zu kompromittieren.
Sicherheitsrichtlinien beim Whitelisten externer Ressourcen
Abschnitt betitelt „Sicherheitsrichtlinien beim Whitelisten externer Ressourcen“Die Integration externer Skripte und Ressourcen kann die Funktionalität von OTOBO erweitern und neue Möglichkeiten für Ihre Service-Desk-Kommunikation eröffnen. Wie in den vorherigen Schritten erklärt, ist es jedoch wichtig, sich der potenziellen Sicherheitsrisiken bewusst zu sein. Jede hinzugefügte externe Ressource birgt die Möglichkeit unerwünschter Einflüsse auf Ihre Anwendung. Daher sollten nur vertrauenswürdige Quellen zugelassen werden.
Der Prozess des Whitelistens
Abschnitt betitelt „Der Prozess des Whitelistens“Beim Whitelisten von Ressourcen in OTOBO durch die Einstellung WebApp::Server::AdditionalOrigins für
verschiedene
CSP-Richtlinien wie script-src, img-src usw., hilft Ihnen die Browser-Konsole, fehlerhafte Ladenversuche zu
identifizieren, die durch die CSP blockiert werden. Indem Sie diesen Anweisungen folgen, können Sie Ihren Nutzern eine
sichere und effiziente Erfahrung bieten.
Wichtig zu beachten
Abschnitt betitelt „Wichtig zu beachten“- Sicherheitsrisiken minimieren: Vermeiden Sie das Whitelisten unbekannter oder unsicherer Quellen.
- Regelmäßige Überprüfungen: Überprüfen Sie periodisch die Quellen, um zu gewährleisten, dass sie weiterhin sicher sind.
- Limitieren Sie den Zugriff: Whitelisten Sie nur die notwendigen Ressourcen, um das Angriffsrisiko zu minimieren.
Zukünftige Funktionen: Kundendienst-Katalog
Abschnitt betitelt „Zukünftige Funktionen: Kundendienst-Katalog“Ein Ausblick auf kommende Funktionen in OTOBO ist der Kundendienst-Katalog. Dieser Bereich wird Ihnen ermöglichen, Kategorien und Elemente speziell für die Nutzung in der externen Schnittstelle zu erstellen. Obwohl diese Funktion noch in der Entwicklung ist, verspricht sie, die Kommunikation und Serviceangebote Ihres Helpdesks noch weiter zu verbessern.
::: warning Für den Einsatz dieser fortschrittlichen Features oder wenn Sie auf der Suche nach speziellen Anpassungen sind, die noch nicht verfügbar sind, zögern Sie nicht, den Kundenservice von OTOBO zu kontaktieren. Die Experten von OTOBO sind stets bereit, individuelle Lösungen zu finden und Ihre Plattform auf die nächste Stufe zu heben. :::
Zusammenfassung
Abschnitt betitelt „Zusammenfassung“Die Anpassung Ihrer OTOBO-Plattform durch das Hinzufügen von externen Skripten und Ressourcen eröffnet ein breites Spektrum an Möglichkeiten. Es ist jedoch essenziell, die Sicherheit Ihrer Anwendung und die Vertrauenswürdigkeit der Quellen zu gewährleisten. Mit angemessener Vorsicht und regelmäßigen Updates gewährleisten Sie eine sichere und reibungslose Nutzung Ihrer Service-Desk-Plattform.
Effektive Verwaltung des Kundendienst-Katalogs in OTOBO
Abschnitt betitelt „Effektive Verwaltung des Kundendienst-Katalogs in OTOBO“Im Rahmen eines gesteigerten Kundenservice bietet OTOBO Ihnen die Möglichkeit, einen umfassenden Kundendienst-Katalog zu erstellen und zu verwalten. Dieses Modul, welches in zwei Hauptkomponenten unterteilt ist - Kategorienverwaltung und Elementverwaltung - ermöglicht eine strukturierte und effiziente Präsentation Ihrer Dienstleistungen und Ressourcen.
Management von Kategorien
Abschnitt betitelt „Management von Kategorien“Die Kategorienverwaltung erlaubt Ihnen, ähnliche Elemente in logischen Gruppen zusammenzufassen. Dies erleichtert den Nutzern das Finden spezifischer Angebote oder Informationen innerhalb Ihrer Plattform.
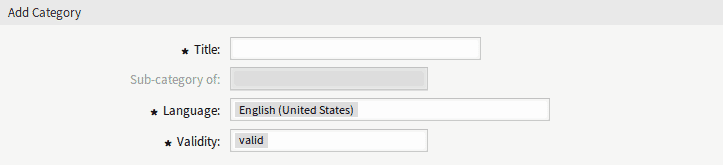
Hinzufügen neuer Kategorien
Abschnitt betitelt „Hinzufügen neuer Kategorien“Um eine neue Kategorie zu Ihrem Katalog hinzuzufügen:
- Zugang zur Kategorienverwaltung: Wählen Sie die Option “Zur Kategorienverwaltung gehen” oder navigieren Sie über das Modul “Kategorienverwaltung”.
- Neue Kategorie: Klicken Sie auf “Kategorie hinzufügen”.
- Details ausfüllen: Vervollständigen Sie die notwendigen Felder mit Informationen zur Kategorie.
- Speichern: Bestätigen Sie mit einem Klick auf “Speichern” Ihre Eingaben.
Bearbeiten und Löschen von Kategorien
Abschnitt betitelt „Bearbeiten und Löschen von Kategorien“Für das Editieren oder das Entfernen bestehender Kategorien folgen Sie einer ähnlichen Prozedur, nur wählen Sie diesmal die entsprechende Kategorie aus der Liste und entscheiden sich für “Bearbeiten” oder nutzen das Mülleimer-Icon zum Löschen.
Management von Elementen
Abschnitt betitelt „Management von Elementen“Elemente stellen konkrete Angebote, Dienstleistungen oder Informationsquellen dar, welche in den jeweiligen Kategorien gruppiert sind.
Wie Sie Elemente hinzufügen
Abschnitt betitelt „Wie Sie Elemente hinzufügen“- Zugang zur Elementverwaltung: Wählen Sie “Zur Elementverwaltung gehen” oder nutzen Sie das Modul ” Elementverwaltung”.
- Element hinzufügen: Klicken Sie auf die Schaltfläche “Element hinzufügen”.
- Informationen eintragen: Füllen Sie die notwendigen Felder mit Details zum Element aus.
- Speichen: Mit einem Klick auf “Speichern” fügen Sie das Element zu Ihrem Katalog hinzu.

Anpassung und Organisation
Abschnitt betitelt „Anpassung und Organisation“Der Kundendienst-Katalog bietet vielfältige Anpassungsmöglichkeiten, darunter die Zuweisung von Elementen zu Unterkategorien und die Auswahl spezifischer Sprachen für verschiedene Kategorien und Elemente. Diese Flexibilität ermöglicht es Ihnen, einen maßgeschneiderten und zugänglichen Katalog für Ihre Nutzer zu schaffen, unabhängig von ihrer präferierten Sprache oder speziellen Interessen.
Hinweis zur Gültigkeit
Abschnitt betitelt „Hinweis zur Gültigkeit“Für eine effektive Nutzung des Kundendienst-Katalogs ist es elementar, die Gültigkeit Ihrer Kategorien und Elemente im Auge zu behalten. Ein Element oder eine Kategorie ist nur dann für Nutzer sichtbar und zugänglich, wenn die Gültigkeit auf “gültig” gesetzt ist.
Der Kundendienst-Katalog in OTOBO ist ein leistungsstarkes Tool zur Strukturierung und Präsentation Ihres Angebots. Durch die gezielte Verwaltung von Kategorien und Elementen können Sie ein übersichtliches und nutzerfreundliches Service-Portfolio gestalten, das den Bedürfnissen und Anforderungen Ihrer Kunden gerecht wird.
Elemente im OTOBO Kundendienst-Katalog bearbeiten
Abschnitt betitelt „Elemente im OTOBO Kundendienst-Katalog bearbeiten“Die Verwaltung der Elemente in Ihrem OTOBO Kundendienst-Katalog ist einfach und intuitiv. Sie können jederzeit Elemente bearbeiten, um ihre Informationen zu aktualisieren, oder Elemente löschen, wenn sie nicht mehr benötigt werden. Hier ist ein detaillierter Leitfaden, wie Sie diese Aktionen durchführen können.
Elemente Bearbeiten
Abschnitt betitelt „Elemente Bearbeiten“Wenn sich Informationen Ihres Angebots ändern oder Sie einfach einen Fehler korrigieren möchten, folgen Sie diesen Schritten, um Elemente in Ihrem Kundendienst-Katalog zu bearbeiten:
-
Auswählen des Elements: Navigieren Sie zum Verwaltungsbildschirm der Elemente. Durchsuchen Sie die Liste und klicken Sie auf das Element, das Sie bearbeiten möchten.
-
Änderungen vornehmen: Auf dem Bearbeitungsbildschirm können Sie die verschiedenen Felder des Elements aktualisieren.
-
Speichern der Änderungen: Nachdem Sie die erforderlichen Anpassungen vorgenommen haben, klicken Sie auf ” Speichern” oder “Speichern und beenden”, um die Änderungen zu bestätigen.

Elemente Löschen
Abschnitt betitelt „Elemente Löschen“Folgen Sie diesen einfachen Schritten, um ein Element aus Ihrem Kundendienst-Katalog zu entfernen:
-
Finden des zu löschenden Elements: Auf der Elementverwaltungsseite suchen Sie nach dem Element, das Sie entfernen möchten.
-
Löschen initiieren: Klicken Sie auf das Mülleimer-Symbol neben dem gewünschten Element.
-
Löschvorgang bestätigen: Ein Bestätigungsdialog wird angezeigt. Klicken Sie auf “Bestätigen”, um das Löschen abzuschließen.

Tipps zur effizienten Verwaltung
Abschnitt betitelt „Tipps zur effizienten Verwaltung“- Filter verwenden: Wenn Ihr Katalog viele Elemente umfasst, nutzen Sie das Filterfeld, um Schnellzugriff auf bestimmte Elemente zu erhalten, indem Sie ihren Namen eingeben.
- Multi-Sprachen-Unterstützung: Beim Hinzufügen oder Bearbeiten eines Elements können Sie Inhalte in verschiedenen Sprachen hinzufügen, um ein breiteres Publikum anzusprechen.
- Kategorienzuweisung: Für eine bessere Organisation und Auffindbarkeit Ihrer Angebote, weisen Sie jedem Element sorgfältig eine oder mehrere Kategorien zu.
Wichtige Elementeinstellungen
Abschnitt betitelt „Wichtige Elementeinstellungen“- Interner Titel: Dieser Titel hilft Ihnen bei der Verwaltung Ihres Katalogs, ist aber für Endnutzer nicht sichtbar.
- Gültigkeit: Nur Elemente, die als gültig markiert sind, werden in der externen Schnittstelle angezeigt. Nutzen Sie diese Einstellung, um temporär Angebote zu deaktivieren, ohne sie zu löschen.
- Lokalisierter Inhalt: Definieren Sie Titel, Texte und Links für jede Sprache, um Ihre Elemente informativ und ansprechend zu gestalten.
Mit diesen Funktionen bietet OTOBO Ihnen umfangreiche Möglichkeiten, Ihren Kundendienst-Katalog sinnvoll zu organisieren und stetig zu aktualisieren.