OTOBO - Kundenportal anpassen
This content is not available in your language yet.
OTOBO - Kundenportal anpassen
Abschnitt betitelt „OTOBO - Kundenportal anpassen“OTOBO hat nicht nur ein Agenten Portal sondern auch ein Kundenportal bzw. customer portal, dieses erreicht man über die URL “DEINEDOMAIN/ otobo/ customer.pl” . Dort können sich die Kundenbenutzer (Customer User) anmelden. Das customer portal ermöglicht es dem Kundenbenutzer, neue Tickets zu erstellen, sowie Tickets zu bearbeiten und Tickets anzuschauen.
Gerne Können Sie das KundenPortal mit unserer Demo Testen!
Kunden Benutzer fürs Kunden Portal erstellen
Abschnitt betitelt „Kunden Benutzer fürs Kunden Portal erstellen“Neue Kundenbenutzer erstellen dürfen alle Agenten, welche Admin Rechte haben.
Um einen neuen Agenten zu erstellen, muss man in den Admin Bereich gehen und dort die Kundenbenutzer Kachel auswählen. Nachdem man einen Kundenbenutzer erstellt hat, kann sich dieser im OTOBO Kundenportal anmelden. In der Kundenbenutzer Kachel sieht man nun alle bereits bisher erstellten Kundenbenutzer.

OTOBO Kundenbenutzer hinzufügen
Wenn man einen dieser Kundenbenutzer anklickt, dann kann man diesen bearbeiten oder auch löschen, bzw. auf ungültig setzen. Um einen neuen Kundenbenutzer hinzuzufügen klick man auf Kundenbenutzer anlegen.

Neuen OTOBO Kundenbenutzer erstellen
Für das Login im Kundenportal / customer portal benötigt der Kundenbenutzer seinen Benutzernamen und sein Passwort. Wenn der Kunde sein Passwort vergessen hat, dann kann er sich ein neues Passwort an seine E-Mail schicken lassen.
Man kann Kundenaber auch die Chance geben sich selbst für das customer portal zu registrieren, dies kann über die Einstellung “Customer Panel Create Account” umgestellt werden.

Falls die Einstellung eingestellt ist, können sich Kunden über das
Kundenportal registrieren. Man kann über die Einstellung
CustomerPanel CreateAccount:: MailRestrictions:: Blacklist und Whitelist
gewisse Emails Blocken oder Freigeben. Zum Beispiel Domains mit einem gewissen
domain name.
In der Login Seite EINEDOMAIN.de/ otobo/ customer.pl gibt es den Link,“Account anfordern” , darüber kann man sich einen neuen Account erstellen. Man gibt dort Vorname, Nachname und Email an, danach erhält man sein Passwort per Email, damit dies funktioniert muss natürlich das Versenden von Emails eingestellt sein, darüber gibt es einen separaten Artikel:
Login im OTOBO Kunden Portal
Abschnitt betitelt „Login im OTOBO Kunden Portal“Für das Login im Kundenportal, muss der Kunde folgende URL aufrufen - DEINEDOMAIN.de/ otobo/customer.pl.

Falls sie Ihr Passwort für das Kundenportal vergessen haben, dann klicken sie auf “Passwort vergessen?”. Daraufhin wird eine Email mit einem Link geschickt, nachdem sie auf diesen Link geklickt haben, bekommen Sie eine zweite Email mit Ihrem neuen Passwort. Sie können diese Passwort Vergessen Funktion ein oder aus stellen über die Systemkonfiguration “CustomerPanel LostPassword ”, über die Einstellung CustomerPanel BodyLost Password sowie die Konfiguration**“CustomerPanel BodyLost PasswordToken”** können sie Email mit dem Passwort-Link und die Email mit dem Passwort geändert werden.
Kunden Portal Logo ändern
Abschnitt betitelt „Kunden Portal Logo ändern“
Um das Bild welches beim Kunden Portal Login angezeigt wird zu verändern, muss man in der SystemkonfigurationCustomer Login::Settings die URL verändern.

Dort kann man mit der Einstellung “Background” verändern, welches Bild gewählt wird. Sowohl eine URL zu einer Bild Datei, als auch ein Pfad zum Bild auf dem Server sind möglich. Mit “LoginText” kann, man den Text welcher im Kundenportal angezeigt wird verändern.
::: info
Derzeit ist es nicht so einfach, den Agenten-Bereich an das eigene CI anzupassen. Änderungen in den OTOBO
.css-Dateien
wären hier notwendig. Eine Ausnahme ist das Logo auf der Agenten-Anmeldeseite und dem Agenten-Header. Die Logos
können
einfach ausgetauscht werden, indem Sie die Logos auf den Server kopieren und dann
die Optionen AgentLoginLogo und AgentLogo unterAdmin -> Systemkonfiguration anpassen.
:::
Dashboard des OTOBO Customer Portals
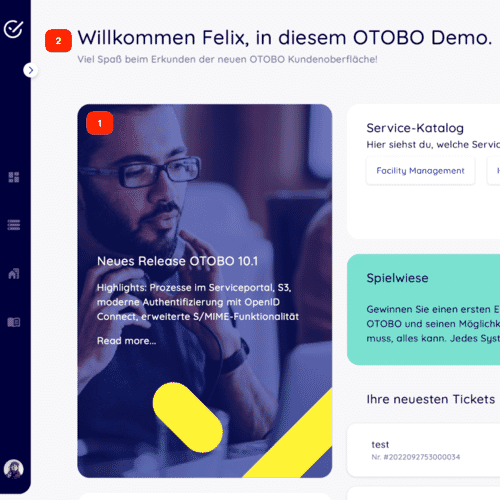
Abschnitt betitelt „Dashboard des OTOBO Customer Portals“Nachdem Sie sich im OTOBO Kundenportal eingeloggt haben, landen Sie im Dashboard des OTOBO Kundenportals

Dashboard des Kundenportals
Dort können Sie Ihre letzten Tickets einsehen, als auch Links zu externen Tools. Über das Feld Ticket erstellen, können sie ein neues Ticket anlegen.
Farben ändern
Abschnitt betitelt „Farben ändern“Um die Farben für die OTOBO-Kundenschnittstelle zu ändern, gehen Sie bitte zu
Admin -> Systemkonfiguration und ändern Sie die folgenden Einstellungen:
-
CustomerColorDefinitions
-
Um die Farben auf dem Kunden-Dashboard zu ändern, gehen Sie bitte zu
Admin -> Systemkonfigurationund suchen nach CustomerDashboard. Im Suchergebnis finden Sie alle notwendigen Optionen mit Farbdefinitionen.
Bilder und Text ändern
Abschnitt betitelt „Bilder und Text ändern“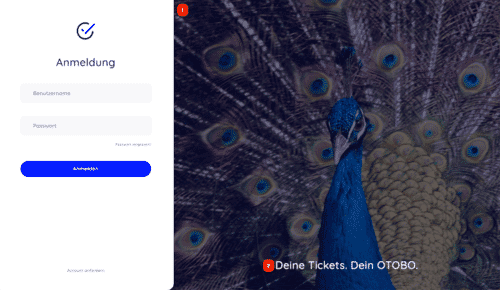
Mit den OTOBO Skins und Themes kann man das Design des gesamten Helpdesks anpassen.
- 1 und 2 - Systemkonfigurationsoption CustomerLogin::Settings
Deckkraft und Wasserzeichen entfernen
Derzeit ist es nicht möglich, das Overlay und das Wasserzeichen, das im rechten Bild verwendet wird, per Systemkonfiguration zu entfernen. Um die Deckkraft zu entfernen, passen Sie bitte die Option #oooLoginBG > .oooBG in der Datei
var/httpd/htdocs/skins/Customer/default/css/Core.Login.css
#oooLoginBG > .oooBG {  position: relative;
  width: 100%;
  height: 100%;
  /* opacity: 0.45; Deckkraft deaktivieren */
  background-size: cover;
  overflow: hidden;}
Um das Wasserzeichen zu entfernen, löschen Sie bitte die folgende Zeile in der
Datei:
Kernel/Output/HTML/Templates/shared/CustomerLogin.tt
<!-- start login -->
<div id="oooLoginBG">
  <div class="oooBG" style="background-image: url([% Data.Background | html %]);">
    # diese Zeile entfernen ->    <div id="oooBGSignet" style="background-image: url([% Config(" Frontend::WebPath    ") %]common/img/otobo-signet_border.svg);">  </div>
  < /div>
  <h1>[% Translate(Data.LoginText) | html %]</h1>
</div>
::: info
Bitte fügen Sie die Dateien im nächsten Schritt einem opm-Paket hinzu, so dass die Änderungen beständig bleiben. :::
Änderung der Kacheln und Optionen des Kunden-Dashboards
Um die Farben auf dem Kunden-Dashboard zu ändern, gehen Sie bitte zu
Admin -> Systemkonfiguration und suchen nach CustomerDashboard.
Im Suchergebnis finden Sie alle benötigten Optionen mit Farbdefinitionen.
-
1 - Um das Bild, den Link und den Text zu ändern, verwenden Sie bitte die Systemkonfigurationsoption * *CustomerDashboard::Tiles###FeaturedLink-01**
-
2 - Um den Top-Level-Text zu ändern, verwenden Sie bitte die Systemkonfigurationsoption CustomerDashboard:: Configuration::Text
::: info
Bitte deaktivieren Sie die Konfigurationsoptionen für nicht benötigte Kacheln.
:::
Kundenportal Dashboard verändern
Abschnitt betitelt „Kundenportal Dashboard verändern“Man kann in den Systemkonfigurationen des Agentenportals, das Aussehen des OTOBO Dashboards ändern. Diese Konfigurationen befinden sich an folgender Stelle:
Frontend -> Customer -> ModelRegistration
Dort werden alle Navigationselemente festgelegt.

In der Einstellung CustomerFrontend::Navigation###CustomerDashboard###002-CustomerDashboard ist das oberste
Navigationselement festgelegt. Mit der
Prio kann man die Reihenfolge der Navigationselemente ändern. Kleinere kommen
zuerst. Mit dem svgIcon, kann man das angezeigt Piktogramm ändern. Mit der
Description wird der Hover-Text festgelegt. Mit Group und GroupRo könnten Sie
Menüpunkte für bestimmte Kundenbenutzer ausschalten.
Mit der Einstellung CustomerDashboard::Configuration::Text kann die
Seitenüberschrift, sowie der Begrüßungstext geändert werden.
Über die Tiles im Konfigurationspfad Frontend -> Customer -> View -> Dashboard -> Tiles. Können die Elemente des Dashboards geändert werden. Folgende Tiles gibt es im Standard Fall:
CustomerDashboard::Tiles###PlainPicture-01definiert das Bild auf dem Dashboard(das ganz unten “Overview”; man könnte das angezeigte Bild austauschenCustomerDashboard::Tiles### PlainText-01- erzeugt eine Kachel, welche einen Text anzeigt. Standardmäßig steht in diesem “Hello World”CustomerDashboard::Tiles###NewTicket- ist ein Button zum Erstellen eines Tickets. Es kann die Farbe des Textes eingestellt werdenCustomerDashboard::Tiles###FeaturedLink-01- zeigt das Bild mit dem Schriftzug Thats new in OTOBO, Background Image Link und Text können verändert werden.CustomerDashboard::Tiles###TicketList-01- zeigt die Liste der Letzten Tickets; Es kann die Reihenfolge, Anzahl der Tickets und weiteres verändert werdenCustomerDashboard::Tiles###ToolBox-01- stellt Icons mit Links da
Ticket im OTOBO Kunden Portal erstellen
Abschnitt betitelt „Ticket im OTOBO Kunden Portal erstellen“In der Ticket-Erstell Maske, können Sie verschiedene Attribute festlegen. Die Felder des Ticket Erstellens können Sie im Admin Bereich verändern.

Felder der Ticket-Erstellung:
Abschnitt betitelt „Felder der Ticket-Erstellung:“- Typ: Der Typ des Tickets - z.B. Problem oder Frage
- An: Die Queue in welcher das Ticket erstellt werden soll
- Betreff: Die Überschrift des Tickets
- Text: Beschreibung des Tickets
- Dateien: Dort können Dateien hochgeladen und dem Ticket angehängt werden
- Priorität: Wie wichtig das Lösen des Tickets ist
Kundenportal Ticket Informationen
Abschnitt betitelt „Kundenportal Ticket Informationen“
Nachdem man ein Ticket angeklickt hat, kann man alle Artikel (Betreff, Nachrichten) . In den Systemkonfiguration kann man einstellen, welche Attribute in dieser Tabelle angezeigt werden.

Wenn ein Feld auf 1 gesetzt ist, wird es angezeigt. Um Dynamische Felder zu der Ansicht hinzuzufügen, muss man dieses Feld zu der dynamischen Felder Oberfläsche - Ticket::Frontend::CustomerTicketZoom
Tickets im Kunden Portal bearbeiten
Abschnitt betitelt „Tickets im Kunden Portal bearbeiten“Natürlich kann man auch bestehende Tickets bearbeiten. Dafür wählt man ein bestimmtes Ticket aus und wählt dann Antworten aus, daraufhin kann man eine Antwort zum Ticket schreiben.

Daraufhin kann man dem Ticket eine Nachricht hinzufügen, sowie einen neuen Status des Tickets festlegen.
Einstellungen im Kunden Portal ändern
Abschnitt betitelt „Einstellungen im Kunden Portal ändern“
Im Otobo Kundenportal kann der Kundenbenutzer seine persönlichen Einstellungen ändern, dafür muss er die Maus über den unten links befindenden Avatar bewegen und dann auf das Zahnrad drücken. In den Einstellungen können die Sprache, das Passwort, die Anzahl angezeigten Tickets sowie die Ticketaktualisierung geändert werden.
OTOBO Kunden Portal anpassen
Abschnitt betitelt „OTOBO Kunden Portal anpassen“Es gibt einige Anpassungsmöglichkeiten für das OTOBO Kundenportal, auf diese können über den Admin Bereich des Agentenportals zugegriffen werden. Die Anpussungs Möglichkeiten findet man in den Systemkonfigurationen. Dort dann unter Frontend -> Customer.

Einstellungs-Möglichkeiten
Abschnitt betitelt „Einstellungs-Möglichkeiten“- CustomerFrontend::Active - schaltet das Kundenportal aus oder an.
- CustomerPanel CreateAccount - gibt Kundendie Möglichkeit sich selbst einen Account zu erstellen
- CustomerPanel LostPassword - schaltet die Passwort vergessen Funktion ein
- Customer Logo - stellt das verwendete Logo im Kundenportal ein
- CustomerPanel BodyLostPassword - stellt die Nachricht, welche das neu eingestelte Passwort hat ein
- CustomerPanel BodyLost PasswordToken - stellt die gesendete Nachricht ein, die gesendet wird wenn jemand auf den “Passwort vergessen” Button geklickt hat
- CustomerPanel Body NewAccount - stellt die Nachricht ein, welche neue Nutzer des Otobo Ticketsystems erhalten
- Customer PanelCreate Account::MailRestrictions::Blacklist - Verbietet es Nutzern mit bestimmten Emails einen Account zu erstellen - Alle Emails welche diesen regulären Ausdruck erfüllen sind verboten
- CustomerPanel CreateAccount::MailRestrictions::Whitelist - falls aktiviert, können sich nur Nutzer einen Account erstellen, wessen Email Account diesen regulären Ausdruck erfüllt
- Customer PanelLogin URL - legt die URL des Kundenportal Logins fest
Weitere Felder beim Ticket erstellen im Kunden Portal
Abschnitt betitelt „Weitere Felder beim Ticket erstellen im Kunden Portal“
Man hat die Möglichkeit noch weitere Felder zur Ticket-Erstell Maske hinzuzufügen. Dies geht über die dynamischen Felder, es gibt folgende Arten an dynamischen Feldern:
- Kontrollkästchen
- Kontaktdaten
- Datenbank
- Datum
- Datum / Zeit
- Einfachauswahl
- Mehrfachauswahl
- Text
- Textfeld
- Titel
- Webservice
Man kann dort einer dieser Arten auswählen, danach kann man die Einstellungen des Feldes festlegen. Wenn man ein Textfeld hinzufügt, dann kann man Name, Beschriftung, Feldreihenfolge, Tooltip-Text, Anzahl der Zeilen, Anzahl der Spalten, Standardwert und ob man die Eingabe mit einem Regulären Ausdruck auf Richtigkeit prüfen will.
Nachdem das Feld erstellt wurde müssen wir jetzt noch festlegen in welchen Oberflächen das Feld angezeigt werden soll, dafür gehen wir auf die Kachel “Dynamische Felder Oberflächen”.