OTOBO Ticketsystem - Logo ändern
This content is not available in your language yet.
OTOBO Ticketsystem - Logo ändern
Abschnitt betitelt „OTOBO Ticketsystem - Logo ändern“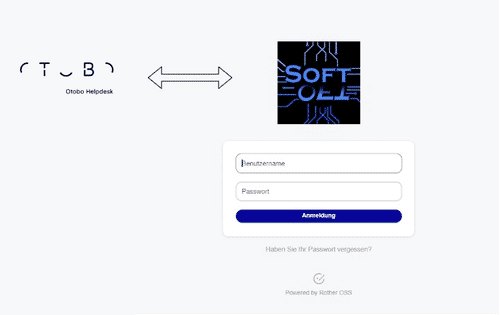
Sie können im OTOBO Ticketsystem das Logo, welches beim Login angezeigt wird, als auch das Logo im Agenten Bereich und sogar das Logo des Kundenportals verändern. Im folgenden zeigen wir dir, wie du das Logo ändern kannst.
Login Logo ändern
Abschnitt betitelt „Login Logo ändern“Das Logo welches beim Login angezeigt wird können sie folgendermaßen verändern:
- Gehen Sie in den Admin Bereich
- Wählen Sie die Systemkonfigurationen aus (Anleitung der Systemkonfigurationen)
- Suchen Sie nach “LoginLogo ”
- Verändern der AgentLoginLogo - URL :
Mit der “Style Height” , können Sie auch die Höhe des Logos anpassen. Die URL kann eine relative oder eine absolute URL zu dem Logo sein.
Agenten Portal Logo ändern
Abschnitt betitelt „Agenten Portal Logo ändern“
Das Logo welches oben rechts im Agenten Portal angezeigt wird, können Sie folgendermaßen ändern:
- Gehen Sie in den Admin Bereich
- Wählen Sie die Systemkonfigurationen aus Anleitung der Systemkonfigurationen
- Suchen Sie nach “AgentLogo”
- Verändern Sie die URL der Einstellung “AgentLogo”
OTOBO Einstellungen AgentLogo
Agent Logo Attribute
Abschnitt betitelt „Agent Logo Attribute“- StyleHeight :Die Höhe des Logos
- StyleRight : Abstand des Logos nach rechts (höherer Wert verschiebt das Logo nach links)
- StyleTop :Abstand des Logos nach oben (höherer Wert verschiebt das Logo nach unten)
- StyleWidth : Die Breite des Logos
- URL : URL zur Bildquelle, welche als Logo verwendet werden soll (kann eine absolute oder relative URL zu einem Bild sein)
Kunden Portal Logo ändern
Abschnitt betitelt „Kunden Portal Logo ändern“
Kundenportal Login Um das Bild welches beim KundenPortal Login angezeigt wird zu verändern, muss man in der Systemkonfiguration**“CustomerLogin::Settings”** die URL verändern.

CustomerLogin::Settings
Dort kann man mit der Einstellung “Background” verändern, welches Bild gewählt
wird. Sowohl eine URL zu einer Bild Datei, als auch ein Pfad zum Bild auf dem
Server sind möglich. Mit “LoginText” kann, man den Text welcher im
Kundenportal angezeigt wird verändern.