OTOBO - POP3- und IMAP-OAuth2-Authentifizierung
This content is not available in your language yet.
OTOBO - POP3- und IMAP-OAuth2-Authentifizierung
Abschnitt betitelt „OTOBO - POP3- und IMAP-OAuth2-Authentifizierung“OTOBO unterstützt nun auch die Authentifizierung über OAuth2 / OpenID Connect für POP3 und IMAP, was eine sichere und moderne Art der Authentifizierung ermöglicht. Nach Installation des * *MailAccount-OAuth2**-Pakets können Sie diese Authentifizierungsmethode nutzen, was insbesondere bei der Verwendung von Cloud-basierenden E-Mail-Diensten wie Microsoft Azure empfehlenswert ist.
Azure-Konfiguration Schritte
Abschnitt betitelt „Azure-Konfiguration Schritte“- Besuchen Sie den Azure-Portal, um Ihre Azure Active Directory Konfiguration zu starten.
- Fügen Sie eine neue Unternehmensanwendung hinzu und erstellen Sie Ihre eigene Anwendung.
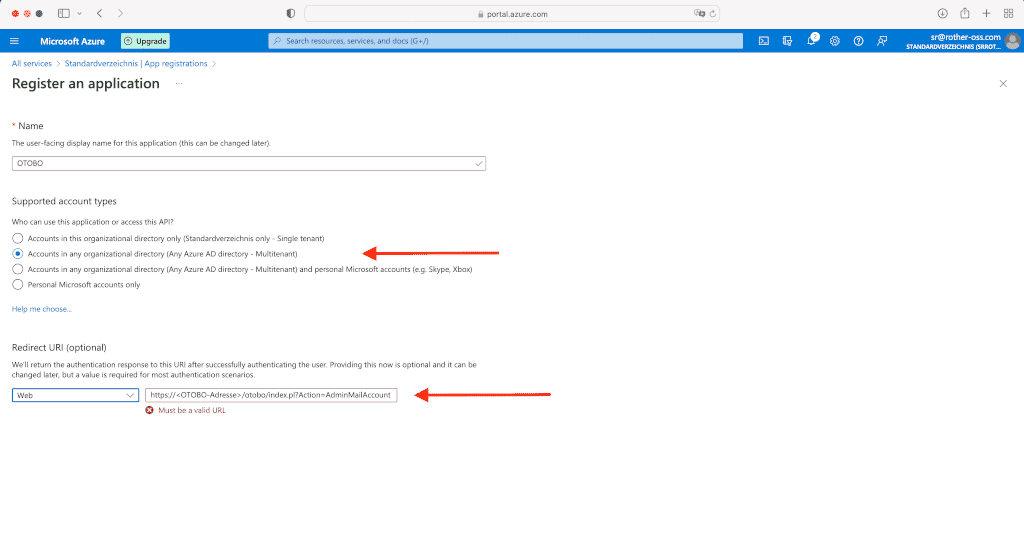
- Weisen Sie Ihrer App einen Namen zu und konfigurieren Sie sie gemäß Ihren Anforderungen.
- Der Mailbox-Benutzer muss der Anwendung zugewiesen werden. Notieren Sie die Anwendungs-ID für die spätere Verwendung in OTOBO.
- Ermitteln Sie die Tenant-ID Ihres Domains, die ebenfalls für die Konfiguration in OTOBO erforderlich ist.
- Erstellen Sie eine neue App in der App-Registrierung, um den Authentifizierungsprozess abzuschließen.
![Azure Konfiguration für OTOBO [1]](https://softoft.sirv.com/Images/otobo/docs/oauth2-001)
Durch die Integration von modernen Authentifizierungsstandards wie OAuth2 in OTOBO verbessern Sie die Sicherheit und Flexibilität Ihrer E-Mail-Kommunikation. Darüber hinaus erleichtert die klare Struktur der E-Mail-Kontoverwaltung in OTOBO eine effiziente und benutzerfreundliche Konfiguration Ihrer E-Mail-Einstellungen, um Ihren Kundensupport und die interne Kommunikation zu optimieren.
OAuth2 Authentifizierung für POP3 und IMAP in OTOBO
Abschnitt betitelt „OAuth2 Authentifizierung für POP3 und IMAP in OTOBO“OTOBO ermöglicht eine hochsichere OAuth2 Authentifizierung für POP3- und IMAP-E-Mail-Konten durch die Integration mit Microsoft Azure, was eine deutliche Verbesserung der Sicherheit und Effizienz in der E-Mail-Kommunikation darstellt.
Die Einrichtung der OAuth2 Authentifizierung umfasst mehrere Schritte in der Azure-Konsole und der OTOBO-Systemkonfiguration.
Schritte zur Einrichtung der Azure für OAuth2 Authentifizierung
Abschnitt betitelt „Schritte zur Einrichtung der Azure für OAuth2 Authentifizierung“-
Umleitungs-URL und geheimer Client-Schlüssel
Erstellen Sie für Ihre Anwendung eine Umleitungs-URL vom Typ Web. Die Umleitungs-URL sollte dabei die Adresse Ihres OTOBO Systems inkludieren, gefolgt von “/otobo/index.pl?Action=AdminMailAccount”.
Azure Schritt zur Erstellung der Umleitungs-URL [1] https://<OTOBO-Adresse>/otobo/index.pl?Action=AdminMailAccountErstellen Sie außerdem einen geheimen Client-Schlüssel und notieren Sie dessen Wert, da dieser später in OTOBO benötigt wird.
-
API-Berechtigungen
Fügen Sie die erforderlichen API-Berechtigungen für
IMAP.AccessAsUser.AllundPOP.AccessAsUser.Allhinzu. Dies gewährt OTOBO die notwendigen Rechte, um auf Ihre E-Mail-Konten zugreifen zu können.
![Clientgeheimnis in Azure erstellen [1]](https://softoft.sirv.com/Images/otobo/docs/oauth2-009)
![API-Berechtigungen hinzufügen [1]](https://softoft.sirv.com/Images/otobo/docs/oauth2-010)
OTOBO OAuth2-Konfiguration
Abschnitt betitelt „OTOBO OAuth2-Konfiguration“Nach Abschluss der Azure-Konfiguration ist es notwendig, die Einstellungen in OTOBO zu übernehmen:
-
Aktivierung des OAuth2 Profils
Navigieren Sie in der OTOBO-Adminoberfläche zur Systemkonfiguration und aktivieren Sie das Profil
OAuth2::MailAccount::Profiles###Custom1. -
Eintragung der Anwendungs-ID und des Clientgeheimnisses
Tragen Sie die zuvor notierte Anwendungs-/Client-ID sowie das Clientgeheimnis in den entsprechenden Feldern ein.
-
Anpassung des OAuth2-Providers
In der Konfiguration
OAuth2::MailAccount::Providers###MicrosoftAzureersetzen Sie den Platzhalter common durch Ihre TenantID.Sobald diese Konfigurationen vorgenommen wurden, können Sie das OAuth2 Profil für Ihre Email-Konten in OTOBO auswählen, um die Authentifizierung zu vervollständigen.
![OAuth2-Einstellungen in OTOBO [1]](https://softoft.sirv.com/Images/otobo/docs/oauth2-012)
![OAuth2-Provider anpassen [1]](https://softoft.sirv.com/Images/otobo/docs/oauth2-013)
![PostMaster Mail Account in OTOBO anpassen [1]](https://softoft.sirv.com/Images/otobo/docs/oauth2-014)
Zusammenfassend verbessern die OAuth2 Authentifizierung und die Verwendung von Postmaster-Filtern die Sicherheit und die Effizienz der E-Mail-Verarbeitung in OTOBO erheblich. Mit diesen Funktionen bietet OTOBO eine leistungsstarke Plattform zur Optimierung der Kommunikation mit Kunden und innerhalb des Teams.