OTOBO - Interfaces
OTOBO - Interfaces
Section titled “OTOBO - Interfaces”::: note Disambiguation This article covers graphical interfaces, not programming interfaces. If you are looking for information on programming interfaces, please read instead:
As well as integration of agents and customers:
- OTOBO Agent Integration (LDAP and DB).
- OTOBO Customer (Company) Integration (LDAP and DB).
- OTOBO Customer User Integration (LDAP and DB). :::
Using external interfaces in the OTOBO ticket system is essential for efficient and effective communication between your service desk and your users. OTOBO is not only an advanced open-source helpdesk and ticket system, but also offers diverse possibilities for integration and customization. From facilitating customer support through the OTOBO Customer Portal to increasing efficiency through OTOBO Managed Services, the range of applications is extensive.
:::warning In Development Some of the features shown will only be unlocked in future OTOBO versions! :::
OTOBO Integration with Other Systems
Section titled “OTOBO Integration with Other Systems”In times of digitalization, a dynamic and user-friendly service desk solution is indispensable. OTOBO offers a platform for this that not only impresses with its simple setup (see “Setting up OTOBO”), but also offers extensive customization options for your corporate identity (see “OTOBO Customization”). The OTOBO interface enables seamless integration into existing systems (see “OTOBO Integration”) and facilitates the management of service requests.
Managing Custom Pages
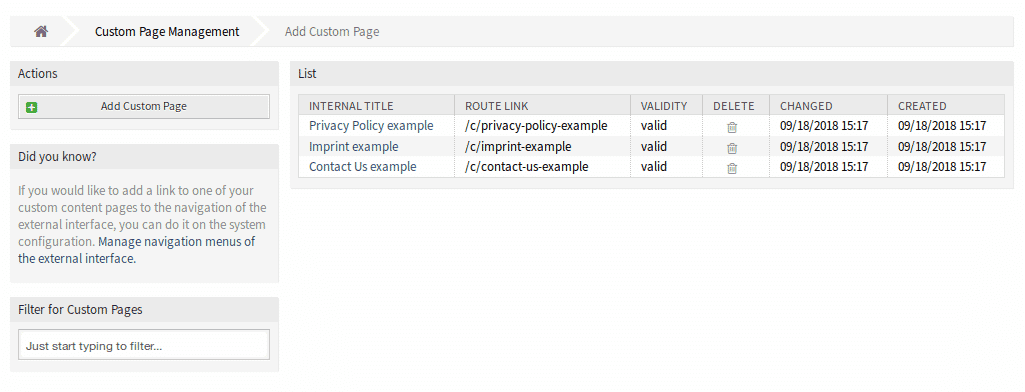
Section titled “Managing Custom Pages”Use the option to create custom pages in the OTOBO ticket system to customize your external interface. OTOBO allows you to easily add and manage custom pages, which represents a valuable resource for providing information such as a service catalog and knowledge base.
Adding Custom Pages
Section titled “Adding Custom Pages”To add a new custom page to your OTOBO system:
- Select the option “Add custom page”.
- Fill in the required fields with your content.
- Save your entries to add the new page to the system.
Editing & Deleting Custom Pages
Section titled “Editing & Deleting Custom Pages”To edit or delete existing pages, navigate through the overview of your custom pages. You can make adjustments or remove pages using the “Edit” and “Delete” options.
Advantages of OTOBO Interfaces
Section titled “Advantages of OTOBO Interfaces”By using the OTOBO interfaces, your service desk requests can be processed more efficiently, while you simultaneously build a solid corporate identity. OTOBO’s flexible configuration options also offer extensive possibilities for customizing and extending your system (see “OTOBO Extension”, “OTOBO Add-ons”).
Invest in OTOBO interfaces to optimize your company’s communication channels. Discover the numerous OTOBO features and their potential for improving your service desk.
Configuration of Custom Pages
Section titled “Configuration of Custom Pages”When adding or editing custom pages in the OTOBO ticket system, there are specific fields that require attention. These fields allow for deep customization and ensure that each page exactly meets your needs and the requirements of your users.
**Internal Title* **
The internal title is essential for management in the backend. It is used to easily identify your custom page
in the interface. Although this field flexibly accepts characters, including spaces and uppercase letters,
it is recommended to choose a clear and descriptive title.
**Slug* **
The slug defines the URL path of your custom page. For better SEO performance and
user-friendliness, you should use lowercase letters, numbers, and hyphens instead of spaces here.
**Validity* **
An essential field for controlling the activation of your page. Only pages marked as valid can be
seen and accessed by users. By setting it to invalid or temporarily invalid, the page is
deactivated but remains in the system.
Content of the custom page
The main area to bring your page to life. You can insert both the title and the content of the page in the
language of your choice. To support multiple language versions of your page,
OTOBO allows for the
easy addition of new custom page content for different languages.
:::warning In Development Some of the features shown will only be unlocked in future OTOBO versions! :::
Managing the Home Page
Section titled “Managing the Home Page”The home page of your OTOBO-based platform serves as a showcase for your users. Use the home page configuration to leave a strong first impression and make important information immediately accessible.
Design of the Hero Unit
Section titled “Design of the Hero Unit”The Hero Unit is a central component of your home page design. With a meaningful title, an appealing background image or color, and the ability to overlay image and color, you can create a visually appealing welcome for your users.
Ticket List
An optional area to display the latest or
most relevant tickets to logged-in users directly on the home page.
The display of this list is configurable and can be activated or
deactivated according to your preferences.
Image Teasers
Section titled “Image Teasers”Image teasers are another method to draw the attention of users to important topics or actions. Placed in a separate row, they offer the possibility to set visual highlights on your home page.
By utilizing the customization options for custom pages and the home page in OTOBO, you can create a platform that is not only functional but also visually and content-wise tailored to your company.
Customizing the Home Page with Image Teasers & Link Lists
Section titled “Customizing the Home Page with Image Teasers & Link Lists”The design of your home page is the figurehead of your OTOBO-based platform. It provides the first impression and guides users to important resources. Image teasers and link lists are powerful tools with which you can optimize your external interface and make it accessible.
Designing Image Teasers
Section titled “Designing Image Teasers”Image teasers draw attention to specific topics or actions and offer a visually appealing method to highlight important aspects of your platform.
How to add image teasers:
Section titled “How to add image teasers:”- Go to the upper right corner of the image teaser widget and click on “Add”.
- Choose a suitable image that supports the message of your teaser.
- Enter a meaningful title and supplementary text.
- Define the link target for users who want to learn more.
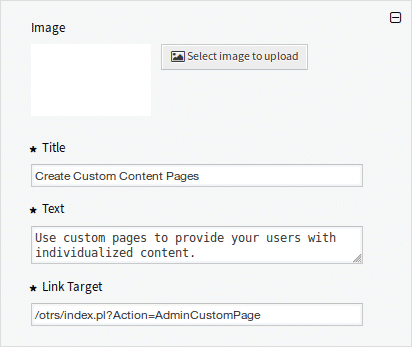
Note that colors and titles are also customizable to ensure a harmonious overall aesthetic for your website.
:::warning In Development Some of the features shown will only be unlocked in future OTOBO versions! :::
Setting up Link Lists
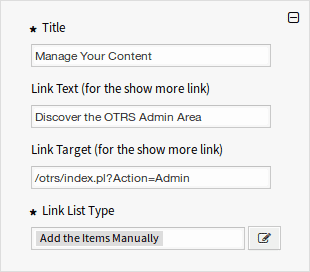
Section titled “Setting up Link Lists”Link lists offer the possibility to present relevant resources in a structured and user-friendly way. They are essential for informative and efficient navigation.
How to set up link lists:
Section titled “How to set up link lists:”- Select “Add” in the upper right corner of the link list widget.
- Provide a concise title for the link list.
- Define the link text and the target to link to detail pages or external resources.
- Decide between manually adding items or displaying search results.
For both options - image teasers and link lists - strategic planning is recommended to ensure that the content is not only aesthetically pleasing but also functional and valuable to the user.
Content Cards: Another Design Element
Section titled “Content Cards: Another Design Element”Content cards are similar to image teasers and link lists as a helpful element to highlight your service offerings and information. You can add up to three content cards, each with an independent title, text, and link for “show more”.
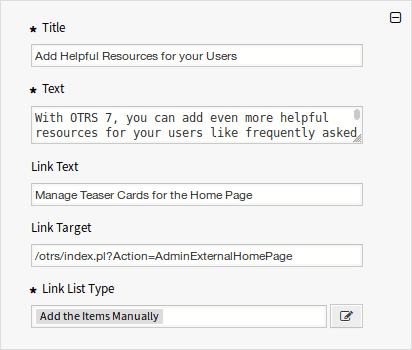
The correct use of these elements not only contributes to a lively and appealing home page but also makes it easier for your website visitors to navigate and find information.
Note for Future Updates
Section titled “Note for Future Updates”While the features described above already allow for versatile customization, it is important to keep in mind that OTOBO is continuously being developed. Future versions are expected to offer further customization options and features. So stay up to date and check regularly for updates and new features to further improve your platform.
Personalizing the External Interface in OTOBO: A Comprehensive Guide
Section titled “Personalizing the External Interface in OTOBO: A Comprehensive Guide”The look and feel of your OTOBO-based platform play a crucial role in how users interact with your service desk. By customizing the layout, you can not only strengthen your brand identity but also improve usability. Here you will learn how to customize the external interface using the layout module.
Changing the Default Layout
Section titled “Changing the Default Layout”A new installation of OTOBO already has an appealing default layout. However, you can modify all aspects of the design according to your branding guidelines to create a unique user interface.
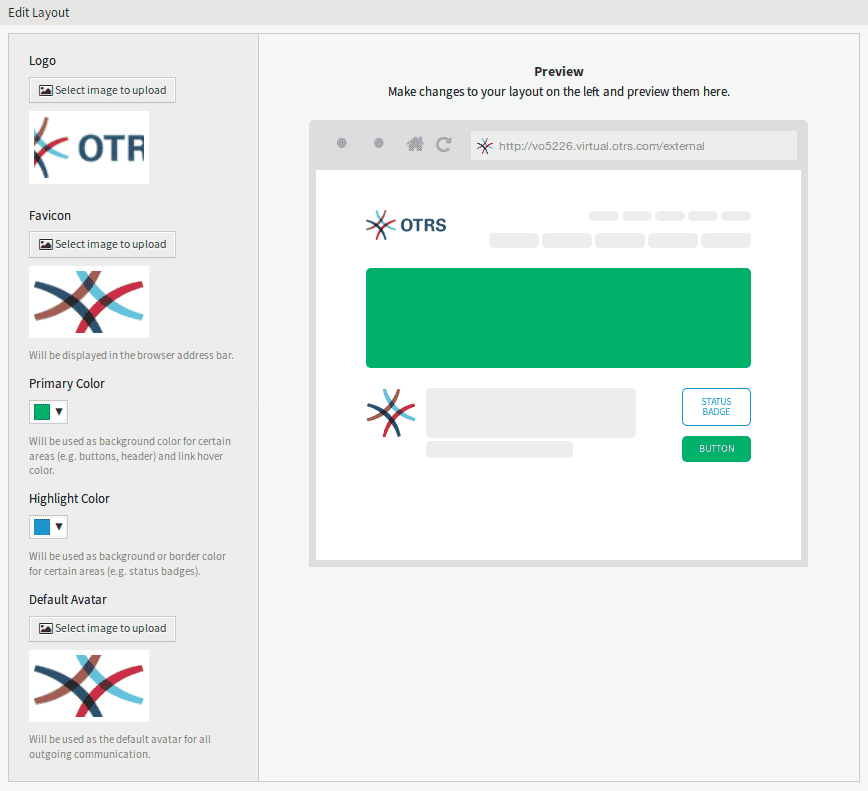
Essential Layout Elements
Section titled “Essential Layout Elements”Logo: A prominent logo in the upper left corner strengthens your brand presence. It is recommended to use a PNG image that is clear and recognizable.
Favicon: The favicon is the small image that appears in the browser的 URL bar. A well-chosen favicon increases the recognition of your platform.
Primary Color and Accent Color: These colors are central to the visual experience on your pages. The selection should reflect your corporate colors and contribute to the general aesthetic of the website.
Default Avatar: A uniform avatar creates visual continuity for all outgoing communications and strengthens the sense of community.
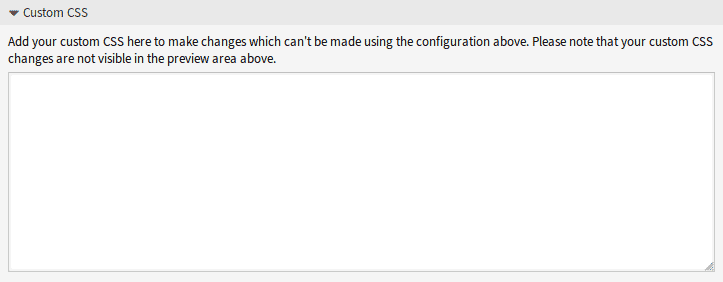
Custom CSS: For deeper customizations, you can add custom CSS. This allows you to design almost every aspect of the user interface according to your wishes.
Advanced Customizations with Custom Scripts
Section titled “Advanced Customizations with Custom Scripts”To extend the functionality of your platform, you can include custom scripts. This is useful for integrated solutions such as chat services or for web analytics.
Example: Including Web Analytics Tools
Section titled “Example: Including Web Analytics Tools”Including external scripts, such as code snippets provided by web analytics providers, allows you to track and analyze user behavior. These scripts can be securely inserted into OTOBO and provide valuable insights that contribute to optimizing the user experience.
Security Standards
Section titled “Security Standards”The external interface of OTOBO relies on high security standards and uses Content Security Policy ( CSP) headers to ensure that only trusted code is executed. This protection mechanism ensures that, even if unexpected code reaches the client, it is not executed by the browser.
Configuration of Custom Scripts
Section titled “Configuration of Custom Scripts”The inclusion of additional scripts in your external interface can be carried out as follows:
ExternalFrontend::ExternalScriptsfor external scripts.ExternalFrontend::InlineScriptsfor inline scripts.WebApp::Server::AdditionalOriginsto specify additional origins.
These settings can be found in the System Configuration.
Summary of Script Inclusion
Section titled “Summary of Script Inclusion”Personalizing the layout of your OTOBO platform is an effective way to build a bridge between your brand identity and the users of your service desk. Through careful adjustment of design elements and the inclusion of custom scripts, you can offer a tailored and secure user experience.
-
Whitelisting the external script resource:
- Navigate to the System Configuration screen.
- Search for the setting
WebApp::Server::AdditionalOrigins. - Edit this setting to add the location of the external script resource (
e.g.,
https://www.example.com).
-
Allowing inline scripts and evaluations:
- This can be more complex, as it may be necessary to change the Content-Security-Policy setting of the web server or a proxy server directly to allow inline scripts and ‘eval’ operations.
- If your OTOBO installation allows access to these deeper web server or proxy server settings,
look for options to change the
script-srcpolicy of the CSP and addunsafe-inlineas well asunsafe-eval.
-
Applying changes after adding:
- Save all changed settings and ensure that the new system configuration is put into effect.
- Run the command
bin/otobo.WebServer.pl --deploy-assetsagain to ensure that all assets are correctly redeployed and the changes are applied.
Verifying the Changes
Section titled “Verifying the Changes”After making these changes and rebuilding the external interface application, you should reload your website and check whether the external and inline scripts are now correctly loaded and executed.
Security Notes:
Section titled “Security Notes:”- It is important to note that adding
unsafe-inlineandunsafe-evalto your CSP can potentially reduce the security of your web application, as this increases the possibility for Cross-Site Scripting (XSS) attacks. Ensure that you only make these changes for trusted script sources. - Whitelisting external sources in CSP is a powerful feature that helps maintain security by ensuring that only content from trusted sources is loaded. Every addition should be carefully checked.
Including external script resources and adding inline code to OTOBO requires careful planning and configuration, especially considering security aspects. By diligently following the steps above, you can extend the functionality of your OTOBO service desk without compromising the security of your users.
Security Guidelines for Whitelisting External Resources
Section titled “Security Guidelines for Whitelisting External Resources”The integration of external scripts and resources can extend the functionality of OTOBO and open up new possibilities for your service desk communication. As explained in the previous steps, however, it is important to be aware of the potential security risks. Every added external resource carries the possibility of unwanted influences on your application. Therefore, only trusted sources should be allowed.
The Process of Whitelisting
Section titled “The Process of Whitelisting”When whitelisting resources in OTOBO through the setting WebApp::Server::AdditionalOrigins for
different
CSP policies such as script-src, img-src, etc., the browser console helps you
identify failed loading attempts that are blocked by the CSP. By following these instructions, you can
offer your users a secure and efficient experience.
Important to Note
Section titled “Important to Note”- Minimize security risks: Avoid whitelisting unknown or insecure sources.
- Regular checks: Periodically check the sources to ensure that they remain secure.
- Limit access: Whitelist only the necessary resources to minimize the risk of attack.
Future Features: Customer Service Catalog
Section titled “Future Features: Customer Service Catalog”An outlook on upcoming features in OTOBO is the Customer Service Catalog. This area will allow you to create categories and items specifically for use in the external interface. Although this feature is still under development, it promises to further improve the communication and service offerings of your helpdesk.
::: warning For the use of these advanced features or if you are looking for special customizations that are not yet available, do not hesitate to contact OTOBO customer service. The experts at OTOBO are always ready to find individual solutions and take your platform to the next level. :::
Summary
Section titled “Summary”Customizing your OTOBO platform by adding external scripts and resources opens up a wide spectrum of possibilities. However, it is essential to ensure the security of your application and the trustworthiness of the sources. With appropriate caution and regular updates, you ensure a secure and smooth use of your service desk platform.
Effective Management of the Customer Service Catalog in OTOBO
Section titled “Effective Management of the Customer Service Catalog in OTOBO”As part of enhanced customer service, OTOBO offers you the possibility to create and manage a comprehensive customer service catalog. This module, which is divided into two main components - category management and item management - allows for a structured and efficient presentation of your services and resources.
Management of Categories
Section titled “Management of Categories”Category management allows you to summarize similar items into logical groups. This makes it easier for users to find specific offers or information within your platform.
Adding New Categories
Section titled “Adding New Categories”To add a new category to your catalog:
- Access to category management: Select the option “Go to category management” or navigate via the “Category Management” module.
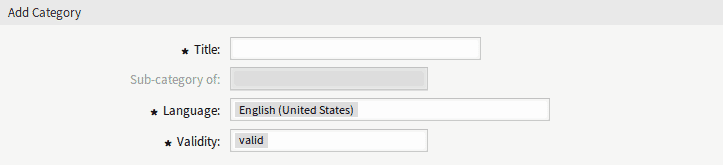
- New category: Click on “Add category”.
- Fill in details: Complete the necessary fields with information about the category.
- Save: Confirm your entries by clicking on “Save”.
Editing and Deleting Categories
Section titled “Editing and Deleting Categories”To edit or remove existing categories, follow a similar procedure, only this time select the corresponding category from the list and choose “Edit” or use the trash can icon to delete.
Management of Items
Section titled “Management of Items”Items represent concrete offers, services, or information sources which are grouped in the respective categories.
How to add items
Section titled “How to add items”- Access to item management: Select “Go to item management” or use the ” Item Management” module.
- Add item: Click on the “Add item” button.
- Enter information: Fill in the necessary fields with details about the item.
- Save: By clicking on “Save”, you add the item to your catalog.

Customization and Organization
Section titled “Customization and Organization”The customer service catalog offers diverse customization options, including the assignment of items to subcategories and the selection of specific languages for different categories and items. This flexibility allows you to create a tailored and accessible catalog for your users, regardless of their preferred language or special interests.
Note on Validity
Section titled “Note on Validity”For effective use of the customer service catalog, it is elementary to keep an eye on the validity of your categories and items. An item or a category is only visible and accessible to users if the validity is set to “valid”.
Conclusion
Section titled “Conclusion”The customer service catalog in OTOBO is a powerful tool for structuring and presenting your offerings. Through targeted management of categories and items, you can design a clear and user-friendly service portfolio that meets the needs and requirements of your customers.
Editing Items in the OTOBO Customer Service Catalog
Section titled “Editing Items in the OTOBO Customer Service Catalog”Managing items in your OTOBO customer service catalog is simple and intuitive. You can edit items at any time to update their information, or delete items if they are no longer needed. Here is a detailed guide on how to perform these actions.
Editing Items
Section titled “Editing Items”When information about your offering changes or you simply want to correct an error, follow these steps to edit items in your customer service catalog:
-
Selecting the item: Navigate to the item management screen. Browse the list and click on the item you want to edit.
-
Making changes: On the edit screen, you can update the various fields of the item.
-
Saving changes: After you have made the necessary adjustments, click on ” Save” or “Save and finish” to confirm the changes.

Deleting Items
Section titled “Deleting Items”Follow these simple steps to remove an item from your customer service catalog:
-
Finding the item to be deleted: On the item management page, search for the item you want to remove.
-
Initiating deletion: Click on the trash can icon next to the desired item.
-
Confirming the deletion process: A confirmation dialog will appear. Click on “Confirm” to complete the deletion.

Tips for Efficient Management
Section titled “Tips for Efficient Management”- Use filters: If your catalog contains many items, use the filter field to get quick access to specific items by entering their name.
- Multi-language support: When adding or editing an item, you can add content in different languages to reach a wider audience.
- Category assignment: For better organization and findability of your offerings, carefully assign each item to one or more categories.
Important Item Settings
Section titled “Important Item Settings”- Internal Title: This title helps you manage your catalog but is not visible to end users.
- Validity: Only items marked as valid are displayed in the external interface. Use this setting to temporarily deactivate offerings without deleting them.
- Localized Content: Define titles, texts, and links for each language to make your items informative and appealing.
With these features, OTOBO offers you extensive possibilities to organize your customer service catalog meaningfully and update it constantly.