Queues in the OTOBO Ticket System
Queues in the OTOBO Ticket System
Section titled “Queues in the OTOBO Ticket System”Managing queues is a central element in OTOBO, the leading open-source ticket system that helps teams organize and manage their workload efficiently. By establishing a clear structure in queues, work items can be optimally assigned based on various criteria, such as skill level, security level, and area of responsibility. In this guide, you will find detailed information on setting up and managing queues in OTOBO, optimizing your workflow, and ensuring effective ticket processing.
Overview
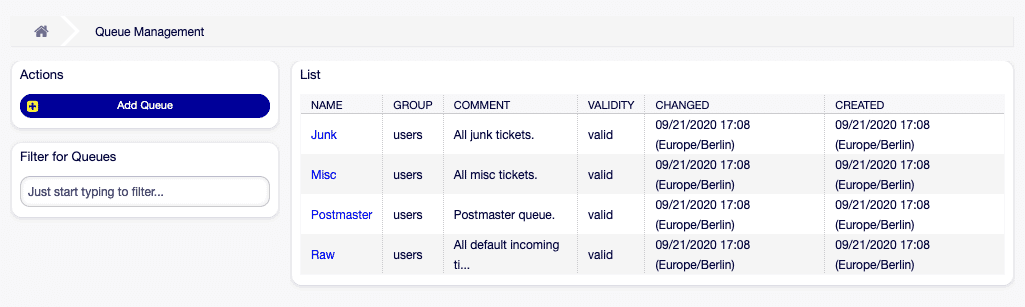
Section titled “Overview”OTOBO allows you to effectively organize work items and provide structure to teams via queues. In every fresh OTOBO installation, there are four predefined queues: Raw, Junk, Misc, and Postmaster. These serve various purposes, such as collecting all incoming messages in Raw when no filter rules are set, or storing spam in Junk. The Queues module under Ticket Settings allows admins to edit or add new queues as needed.
Managing Queues
Section titled “Managing Queues”Adding a New Queue
Section titled “Adding a New Queue”- Select Add Queue in the left sidebar.
- Fill in the necessary fields.
- Confirm with Save.
![Dialog for adding a queue [1]](https://softoft.sirv.com/Images/otobo/docs/queue-add)
Editing Existing Queues
Section titled “Editing Existing Queues”- Select the desired queue from the overview.
- Make changes to the fields.
- Click Save or Save and finish.
![Dialog for editing a queue [1]](https://softoft.sirv.com/Images/otobo/docs/queue-edit)
Notes and Tips
Section titled “Notes and Tips”::: info Queues can not be completely removed from OTOBO/Znuny; they can only be deactivated by setting the Validity to invalid or invalid-temporarily. :::
::: tip Use the filter field to quickly find a specific queue by entering its name. :::
::: info When changing a queue name that is used in the System Configuration, a validation check is performed and a warning is issued. Several options are available to proceed with the change. :::
![Dialog for queue validation [1]](https://softoft.sirv.com/Images/otobo/docs/queue-system-config-validation)
Queue Settings
Section titled “Queue Settings”The configuration options for queues include, among others:
- Name: The unique name of the queue.
- Subqueue of: Here, the new queue can be assigned to an existing queue as a subqueue.
Conclusion
Section titled “Conclusion”By effectively using queues in the OTOBO ticket system, companies can significantly improve the processing of customer inquiries and internal tasks. Careful configuration and management of queues support teams in working in an organized and efficient manner.
Advanced Queue Settings
Section titled “Advanced Queue Settings”The effective configuration of ticket queues is crucial for smooth ticket management in OTOBO. With the following settings, the processing time of Tickets can be optimized and a higher level of customer satisfaction can be achieved.
Automatic Queue with AI Classification (OpenTicketAI)
Section titled “Automatic Queue with AI Classification (OpenTicketAI)”With the AI classification from OpenTicketAI, Tickets can be automatically routed to the correct queue. This intelligent automation saves time and resources, eliminates manual sorting efforts, and ensures significantly faster processing of inquiries.
Further information on the integration can be found here: OTOBO AI Ticket Classification
Access Control and Processing Deadlines
Section titled “Access Control and Processing Deadlines”- Group: This restricts access to a queue to specific Groups, creating an interface between queues and user roles (agents or customers).
- Unlock timeout in minutes: Defines the duration after which a locked ticket is automatically released. A value of 0 means that the lock remains until it is manually removed.
Escalation Management
Section titled “Escalation Management”- Escalation - First Response Time (minutes): Sets a timeframe for the Agent’s first response to a ticket. Please note that this time limit is not activated for emails or calls initiated by the Agent.
- Escalation - Update Time (minutes) and Escalation - Solution Time (minutes): These fields determine the time windows for maintaining communication with the Customer and for problem resolution. Note: The solution time is not reset when a ticket is reopened.
Notification Settings
Section titled “Notification Settings”- Notify by: Allows for the setting of notifications based on the progress of the escalation time (expressed as a percentage) to proactively inform both Agents and Customers.
Handling Follow-ups
Section titled “Handling Follow-ups”- Follow-up Option: Determines the procedure for customer reactions to already closed tickets. Options include creating a new ticket, reopening the previous Ticket, or rejecting the follow-up.
- Lock ticket after a follow-up: If reopening a ticket is possible, this option can lock the ticket for the last processor to ensure continuous support.
Further Individual Queue Settings
Section titled “Further Individual Queue Settings”- System address: Sets the sender identity for emails from this queue.
- Default signature key: Becomes active if security keys or certificates are configured and selects the default key for email signatures.
- Salutation and Signature: Predefined elements selectable for outgoing communication.
- Calendar: Determines working hours based on the calendars defined in the system.
- Validity: A central setting that determines whether the queue is active.
- Comment: Serves as an explanation and can contain additional information or guidelines for using the queue.
Every change to these settings can significantly influence ticket processing. Therefore, the configuration should be carefully planned and regularly reviewed to ensure that the ticket system functions efficiently and in a customer-friendly manner. Detailed knowledge and skillful application of these settings are key factors for the success of any support team using OTOBO.
Ticket Queue Overview
Section titled “Ticket Queue Overview”The Ticket Queue Overview is located in the dashboard of the OTOBO ticket system.
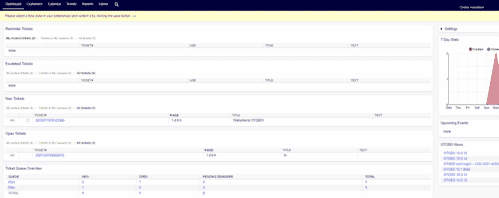
OTOBO Dashboard
In the Ticket Queue Overview, a table displays how many tickets are in a specific queue in a certain Status.
Dashboard Settings
Section titled “Dashboard Settings”Every Agent has the option to configure the dashboard according to their own preferences.
You can hide the ticket overview by going into the dashboard settings.

OTOBO Dashboard-Settings
Ticket Overview Settings
Section titled “Ticket Overview Settings”Changes to the Ticket Queue Overview can be made in the System Configuration.
To do this, you must change the setting DashboardBackend###0270-TicketQueueOverview.
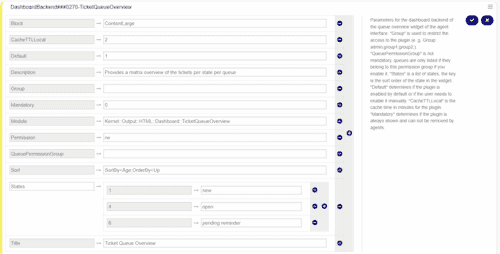
DashboardBackend###0270-TicketQueueOverview
To set a Status so that it is no longer displayed in the overview, it must be removed from the States item by clicking the minus sign.
Adding a New Status to the Ticket Queue View
Section titled “Adding a New Status to the Ticket Queue View”For a newly created Status to be displayed in the Ticket Queue Overview, it must be added using the + sign under States.
The numbers indicate the position or order of the statuses in the ticket overview.
Communication with Auto Responses
Section titled “Communication with Auto Responses”Auto responses are an essential tool in customer service for responding quickly and effectively to customer inquiries. In OTOBO, the advanced ticket system, auto responses provide immediate feedback to customers, informing them that their inquiry has been received and is being processed. This feature is particularly valuable as it manages Customer expectations from the start and contributes to increasing customer satisfaction.
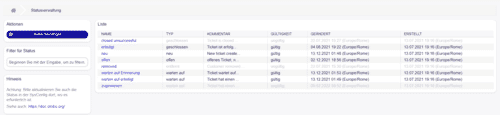
Integration of the Chat Channel for Improved Communication
Section titled “Integration of the Chat Channel for Improved Communication”- Chat channel: A specific chat channel can be set for communication in connection with Tickets arriving in this queue. This integration enables a seamless connection with Customers in real-time and expands the communication options within the system.
![Screen for managing auto responses [1]](https://softoft.sirv.com/Images/otobo/docs/auto-response-management)
::: tip Auto responses require a valid system address. System addresses are configured in the email address area (Communication and Notifications). :::
Adding an Auto Response
Section titled “Adding an Auto Response”- Select Add Auto Response in the left sidebar.
- Fill in all required fields.
- Click Save to apply the settings.
![Screen for adding an auto response [1]](https://softoft.sirv.com/Images/otobo/docs/auto-response-add)
Editing an Auto Response:
Section titled “Editing an Auto Response:”- Select an auto response from the overview.
- Adjust the fields as needed.
- Confirm the changes with Save or Save and finish.
![Screen for editing an auto response [1]](https://softoft.sirv.com/Images/otobo/docs/auto-response-edit)
::: info Auto responses cannot be deleted, only deactivated by adjusting the Validity. :::
Key Settings for Auto Responses
Section titled “Key Settings for Auto Responses”- Name: Unique identifier of the auto response.
- Subject: The default subject of the email that is sent.
- Response: Content design of the auto response.
- Type: Determines the event that triggers the sending of the auto response. It is important here to distinguish between responses to follow-up inquiries and auto responses to new tickets.
Efficient management of auto responses contributes significantly to optimizing customer service. By using this feature in OTOBO, the response time to customer inquiries can be drastically reduced, leaving a positive, professional first impression.
Relationship Between Queues and Auto Responses
Section titled “Relationship Between Queues and Auto Responses”In OTOBO, structuring queues in combination with auto responses enables clear and efficient Communication with customers. This combination ensures immediate and correct notification of the customer regarding relevant service information or changes that must be communicated promptly. OTOBO offers the flexibility to assign auto responses specifically to individual queues.
Event Types and Sender Configuration
Section titled “Event Types and Sender Configuration”Auto responses are triggered based on events, which are defined in OTOBO as follows:
- auto reject: Triggers an auto response when a Customer is prohibited from following up on a closed ticket.
- auto remove: Is sent as soon as a ticket is removed from the system.
- auto reply: Generates an immediate response upon the creation of a new ticket. Depending on the system configuration, this can also apply to Tickets submitted via the customer web interface or by phone.
- auto reply/new ticket: Informs the Customer about the assignment of a new ticket number if the original inquiry leads to a new ticket.
Effective use of these responses begins with defining the sender email address and the validity of the auto response to ensure that only activated and relevant communication streams interact with customers.
Flexible Messages with Variables
Section titled “Flexible Messages with Variables”To ensure that messages are personal and relevant, OTOBO supports the use of variables (or tags) in message texts. An example of this is <OTOBO_TICKET_TicketNumber>, which expands to the specific ticket number, effectively achieving individualization of the Communication.
![Variables for auto responses [1]](https://softoft.sirv.com/Images/otobo/docs/auto-response-variables)
Assigning Responses to Queues
Section titled “Assigning Responses to Queues”The module area Queues ↔ Auto Responses is used to link one or more auto responses to specific queues. This allows for detailed control over what information customers receive based on the origin or Type of their inquiry.
![Management between queues and auto responses [1]](https://softoft.sirv.com/Images/otobo/docs/auto-response-queue-management)
Effective management of these relationships helps maintain consistency in customer communication and ensures that customers always receive the most relevant information. Managing the relationship between queues and auto responses thus forms an important pillar for an excellent service experience. Only a few steps are necessary to make such an assignment, and the flexible configuration in OTOBO offers numerous possibilities for optimizing customer communication.
Queues ↔ Auto Responses
Section titled “Queues ↔ Auto Responses”Assigning auto responses to specific queues is a crucial step to ensure that customers receive the appropriate and necessary information efficiently. In OTOBO, this step can be performed easily and contributes significantly to customer satisfaction and efficiency in the ticket management system.
Steps for Assigning Auto Responses to Queues
Section titled “Steps for Assigning Auto Responses to Queues”- Select the desired queue from the Queues column.
- Select the auto responses that should be assigned to this specific queue.
- Confirm the assignment by clicking Save or Save and finish.
![Screen for assigning auto responses to queues [1]](https://softoft.sirv.com/Images/otobo/docs/auto-response-queue-queue)
::: info It is not directly possible to assign multiple queues to an auto response simultaneously. Changing the assignment is primarily done by selection from the queue view. :::
Optimal Use of Settings
Section titled “Optimal Use of Settings”The settings for assigning auto responses to queues allow for a differentiated response to various customer scenarios:
- auto reply: Is the standard response to inquiries treated as a new, non-follow-up ticket.
- auto reject: Corresponds to the response to attempted follow-ups that are not permitted due to the queue setting reject.
- auto follow up: Becomes active for inquiries that allow for following up on existing tickets.
- auto reply/new ticket: The assignment occurs when a follow-up attempt results in the creation of a new Ticket.
- auto remove: Takes effect when a ticket is removed from the system.
Please note that auto reply, auto reject, and auto reply/new ticket are mutually exclusive, according to the settings of the respective queue. Here, it is carefully decided which auto response represents the adequate feedback for the event that has occurred.
Conclusion
Section titled “Conclusion”The precise configuration of the connection between queues and auto responses in OTOBO is essential to ensure efficient and clear Communication with customers. Through the intelligent assignment of these elements, you ensure that your Customers are informed promptly and appropriately about the status of their inquiries. A strategically thought-out setup thus contributes significantly to successful customer service.
Analyzing Queues with Statistics
Section titled “Analyzing Queues with Statistics”You can analyze data from queues in OTOBO using statistics. There is the possibility to create new statistics to analyze, for example, how many Tickets were created in a specific queue in the last week. Here you will find further information on creating statistics in OTOBO.