
Advanced installation of OTOBO with Docker Compose
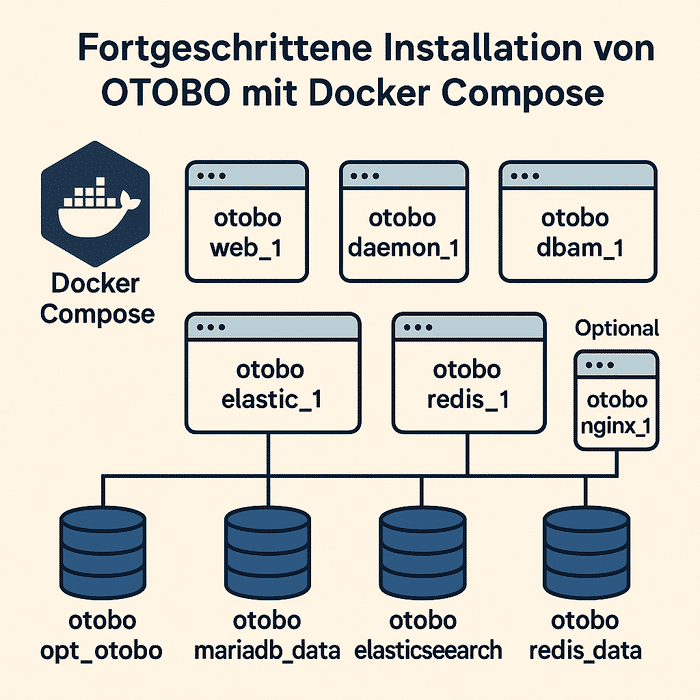
This guide covers advanced configuration for the official otobo-docker stack. It assumes you have already completed the basic Docker Compose installation and want to enable HTTPS, tune the stack, or adapt it to your infrastructure.
[!NOTE] All commands below use
docker compose(Compose v2). On older systems you can replace it withdocker-compose.
Prerequisites
Section titled “Prerequisites”- A working OTOBO installation with the official
otobo-dockerrepository cloned to/opt/otobo-docker - SSH access to the host
- For HTTPS: a valid TLS certificate and private key (e.g. from Let’s Encrypt or your CA)
Understanding the Docker stack
Section titled “Understanding the Docker stack”The Compose stack runs five services for HTTP, or six when HTTPS is enabled:
| Service | Container (OTOBO 11) | Purpose |
|---|---|---|
web | otobo-web-1 | OTOBO web server (internal port 5000) |
daemon | otobo-daemon-1 | Background tasks (mail fetch, escalations, cron) |
db | otobo-db-1 | MariaDB database (internal port 3306) |
elastic | otobo-elastic-1 | Elasticsearch (ports 9200/9300) |
redis | otobo-redis-1 | Redis cache |
nginx (HTTPS only) | otobo-nginx-1 | Nginx reverse proxy with TLS |
[!NOTE] On OTOBO 10.x installations, container names use underscores instead of hyphens (e.g.
otobo_web_1).
Verify running containers:
cd /opt/otobo-dockersudo docker compose psDocker volumes
Section titled “Docker volumes”Docker volumes persist data on the host. Containers can be recreated without losing application data:
| Volume | Mount point | Used by |
|---|---|---|
otobo_opt_otobo | /opt/otobo | web, daemon |
otobo_mariadb_data | /var/lib/mysql | db |
otobo_elasticsearch_data | /usr/share/elasticsearch/data | elastic |
otobo_redis_data | Redis data directory | redis |
otobo_nginx_ssl | TLS certificate and key | nginx (HTTPS) |
[!WARNING] Never delete volumes unless you have a verified backup. See Backup & Restore for guidance.
Enable HTTPS with the built-in Nginx proxy
Section titled “Enable HTTPS with the built-in Nginx proxy”For production environments, run OTOBO over HTTPS using the Nginx container included in the stack.
Step 1: Switch to the HTTPS environment file
Section titled “Step 1: Switch to the HTTPS environment file”cd /opt/otobo-dockersudo cp -p .docker_compose_env_https .envIf you already have a .env file from an HTTP installation, back it up first or merge your existing settings (especially OTOBO_DB_ROOT_PASSWORD) into the new file.
Step 2: Configure TLS certificate paths
Section titled “Step 2: Configure TLS certificate paths”Edit .env and set the paths to your certificate and private key inside the Nginx container:
sudo nano .envOTOBO_NGINX_SSL_CERTIFICATE=/etc/nginx/ssl/acme.crtOTOBO_NGINX_SSL_CERTIFICATE_KEY=/etc/nginx/ssl/acme.keyPlace your certificate files in the otobo_nginx_ssl volume or mount them from the host. The exact mount is defined in docker-compose/otobo-override-https.yml.
Step 3: Start or restart the stack
Section titled “Step 3: Start or restart the stack”sudo docker compose up --detachWith HTTPS enabled, six containers should be running (including nginx). Open the installer or agent interface at:
https://<your-server-fqdn>/otobo/Step 4: Complete the web installer
Section titled “Step 4: Complete the web installer”If this is a fresh installation, follow the web installer steps and use the same database settings as for HTTP (db as hostname, OTOBO_DB_ROOT_PASSWORD as root password).
Environment variables
Section titled “Environment variables”The .env file controls the entire stack. The sample files .docker_compose_env_http and .docker_compose_env_https are starting points; adjust values as needed.
Database
Section titled “Database”| Variable | Description |
|---|---|
OTOBO_DB_ROOT_PASSWORD | MariaDB root password. Required for the db service and the web installer. |
Elasticsearch
Section titled “Elasticsearch”Elasticsearch needs adequate memory in production. See the Elasticsearch Docker production guide for host-level requirements.
| Variable | Description |
|---|---|
OTOBO_Elasticsearch_ES_JAVA_OPTS | JVM heap settings, e.g. -Xms512m -Xmx512m. Increase up to 4 GB for larger installations. |
Web server and Nginx
Section titled “Web server and Nginx”| Variable | Description |
|---|---|
OTOBO_WEB_HTTP_PORT | External HTTP port (default 80). Redirects to HTTPS when Nginx is enabled. |
OTOBO_WEB_HTTPS_PORT | External HTTPS port (default 443). |
OTOBO_NGINX_SSL_CERTIFICATE | Path to the TLS certificate inside the Nginx container. |
OTOBO_NGINX_SSL_CERTIFICATE_KEY | Path to the TLS private key inside the Nginx container. |
OTOBO_NGINX_WEB_HOST | Internal HTTP host used by Nginx to reach the web service. |
OTOBO_NGINX_WEB_PORT | Internal HTTP port of the web service. |
Kerberos SSO (optional)
Section titled “Kerberos SSO (optional)”| Variable | Description |
|---|---|
OTOBO_NGINX_KERBEROS_KEYTAB | Kerberos keytab file (default /etc/krb5.keytab). Must be mounted from the host. |
OTOBO_NGINX_KERBEROS_CONFIG | Kerberos config file (default /etc/krb5.conf). |
OTOBO_NGINX_KERBEROS_REALM | Kerberos realm, used in /etc/krb5.conf. |
OTOBO_NGINX_KERBEROS_KDC | KDC / Active Directory controller. |
OTOBO_NGINX_KERBEROS_ADMIN_SERVER | Kerberos admin server. |
OTOBO_NGINX_KERBEROS_DEFAULT_DOMAIN | Default domain for Kerberos. |
Use .docker_compose_env_https_kerberos as the base and follow the dedicated Kerberos SSO guide for Active Directory setup.
Docker Compose settings
Section titled “Docker Compose settings”| Variable | Description |
|---|---|
COMPOSE_PROJECT_NAME | Prefix for container and volume names (default otobo). Change this to run multiple OTOBO instances on one host. |
COMPOSE_FILE | Colon-separated list of Compose files, e.g. docker-compose/otobo-base.yml:docker-compose/otobo-override-https.yml. |
COMPOSE_PATH_SEPARATOR | Separator character for COMPOSE_FILE (default : on Linux). |
OTOBO_IMAGE_OTOBO | Override the OTOBO web/daemon image tag. |
OTOBO_IMAGE_OTOBO_ELASTICSEARCH | Override the Elasticsearch image. |
OTOBO_IMAGE_OTOBO_NGINX | Override the Nginx image. |
Custom Nginx configuration
Section titled “Custom Nginx configuration”The nginx container uses an OTOBO-specific template at /etc/nginx/template/otobo_nginx.conf.template. Environment variables are substituted when the container starts.
For changes beyond what the .env file supports, export the active configuration and mount your own file:
cd /opt/otobo-dockermkdir -p nginxsudo docker cp otobo-nginx-1:/etc/nginx/conf.d/otobo_nginx.conf nginx/otobo_nginx.confAdd a volume mount in a custom override file (do not edit files under docker-compose/ directly — see below):
services: nginx: volumes: - /opt/otobo-docker/nginx/otobo_nginx.conf:/etc/nginx/conf.d/otobo_nginx.conf:roInclude the file via COMPOSE_FILE in .env, then restart:
sudo docker compose up --detachFor a fully custom Nginx setup, start from .docker_compose_env_https_custom_nginx.
Non-standard ports
Section titled “Non-standard ports”If ports 80 or 443 are already in use, set alternative ports in .env:
OTOBO_WEB_HTTP_PORT=8080OTOBO_WEB_HTTPS_PORT=8443Restart the stack after changing port values.
Using an external database
Section titled “Using an external database”By default, all five (or six) services start together. If MariaDB runs outside Docker, start only the services you need:
sudo docker compose up --detach web nginx daemon redis elasticAlternatively, create a custom Compose override that removes or disables the db service, then point OTOBO to your external database during installation.
Custom Compose overrides
Section titled “Custom Compose overrides”Avoid editing files in docker-compose/ directly — they are overwritten when you update the otobo-docker repository. Instead, add your own YAML file and reference it in COMPOSE_FILE.
Example: expose the database on port 3306 for external access.
Create custom_db.yml:
services: db: ports: - "0.0.0.0:3306:3306"Add it to .env:
COMPOSE_FILE=docker-compose/otobo-base.yml:docker-compose/otobo-override-http.yml:custom_db.ymlRecreate the containers:
sudo docker compose stopsudo docker compose up --detachThis pattern works for any service or volume customization.
Customizing the OTOBO application
Section titled “Customizing the OTOBO application”Most application-level changes belong in the otobo_opt_otobo volume (/opt/otobo inside the container), not in a modified Docker image.
Install a local Perl module without rebuilding the image:
sudo docker compose exec web bashcd /opt/otobocpanm -l local Some::ModuleexitModules installed under /opt/otobo/local persist across container restarts.
To add system packages (e.g. extra Debian tools), build a custom image from a Dockerfile based on rotheross/otobo, or use docker commit on a temporary root session. This is rarely needed for production installations.
Building local Docker images
Section titled “Building local Docker images”[!NOTE] Building images locally is mainly useful for OTOBO development or when you need a patched base image.
Dockerfiles live in the OTOBO source repository:
cd /optgit clone https://github.com/RotherOSS/otobo.gitcd otobogit checkout rel-11_0bin/docker/build_docker_images.shdocker image lsBuilt images are tagged as local-<OTOBO_VERSION>. Reference them in .env:
OTOBO_IMAGE_OTOBO=local-11.0.xOTOBO_IMAGE_OTOBO_ELASTICSEARCH=local-11.0.xOTOBO_IMAGE_OTOBO_NGINX=local-11.0.xAutomatic installation (development)
Section titled “Automatic installation (development)”For test environments, skip the web installer and use the built-in setup script:
[!WARNING]
docker compose down -vdeletes all volumes and data. Use only on disposable test systems.
cd /opt/otobo-dockersudo docker compose down -vsudo docker compose up --detachsudo docker compose stop daemonsudo docker compose exec web bash -c \ "rm -f Kernel/Config/Files/ZZZAAuto.pm ; bin/docker/quick_setup.pl --db-password otobo_root"sudo docker compose start daemonUseful commands
Section titled “Useful commands”Stack management
Section titled “Stack management”sudo docker compose ps # show running containerssudo docker compose logs -f web # follow web server logssudo docker compose logs -f elastic # follow Elasticsearch logssudo docker compose restart # restart all servicessudo docker compose stop # stop all servicessudo docker compose config # validate and display merged configInside the OTOBO container
Section titled “Inside the OTOBO container”sudo docker compose exec web bash # open a shell in the web containerSystem maintenance
Section titled “System maintenance”docker system prune -a # remove unused images, containers, and networks (use with care)Further topics
Section titled “Further topics”- Backup & Restore — protect database and Docker volumes
- Updating OTOBO — upgrade to a new release safely
- Performance optimization — tune Elasticsearch and OTOBO for high volume
- Kerberos SSO — Single Sign-On with Active Directory
- Basic Docker Compose installation — return to the standard install guide
For professional support with installation or integration, contact Softoft.de.
Frequently asked questions
When should I use the advanced Docker Compose guide?
Use it after the basic Docker Compose install when you need HTTPS, Nginx, custom overrides, or stack tuning.
Does the otobo-docker stack include an Nginx reverse proxy?
Yes. For HTTPS you enable the built-in Nginx container with TLS certificate paths in the .env file. The Compose stack runs five services for HTTP, or six when HTTPS is enabled: [!NOTE] On OTOBO 10.x installations, container names use underscores instead of hyphens (e.g. `otobo_web_1`). Verify running containers:
Will Docker volumes keep my OTOBO data if containers are recreated?
Yes. Application, database, Elasticsearch, and Redis data live in named Docker volumes and persist across recreations.
What should I know about Prerequisites?
A working OTOBO installation with the official `otobo-docker` repository cloned to `/opt/otobo-docker` SSH access to the host For HTTPS: a valid TLS certificate and private key (e.g. from Let's Encrypt or your CA)
What should I know about Step 3: Start or restart the stack?
With HTTPS enabled, six containers should be running (including `nginx`). Open the installer or agent interface at: