OTOBO - Customizing the Customer Portal
OTOBO - Customizing the Customer Portal
Section titled “OTOBO - Customizing the Customer Portal”OTOBO has not only an Agent portal but also a customer portal, which can be accessed via the URL “YOURDOMAIN/otobo/customer.pl”. This is where Customer Users can log in. The customer portal allows the customer user to create new Tickets, as well as edit and view Tickets.
Feel free to test the customer portal with our demo!
Creating Customer Users for the Customer Portal
Section titled “Creating Customer Users for the Customer Portal”All agents with admin rights are allowed to create new Customer Users.
To create a new Agent, you must go to the Admin area and select the Customer Users tile. After creating a customer user, they can log in to the OTOBO customer portal. In the customer user tile, you can now see all previously created customer users.

Adding OTOBO Customer Users
If you click on one of these Customer Users, you can edit or delete them, or set them to invalid. To add a new customer user, click on Add Customer User.

Creating a new OTOBO Customer User
For logging into the customer portal, the customer user needs their username and password. If the Customer has forgotten their password, they can have a new password sent to their email address.
You can also give Customers the opportunity to register themselves for the customer portal; this can be changed via the setting “Customer Panel Create Account”.

If the setting is enabled, Customers can register via the customer portal. You can block or allow certain Emails via the settings CustomerPanel CreateAccount::MailRestrictions::Blacklist and Whitelist. For example, domains with a certain domain name.
On the login page YOURDOMAIN.de/otobo/customer.pl, there is a link, “Request account”, which can be used to create a new account. You enter your first name, last name, and Email there, and then you receive your password via email. For this to work, sending Emails must of course be configured; there is a separate article on this.
Login to the OTOBO Customer Portal
Section titled “Login to the OTOBO Customer Portal”To log in to the customer portal, the Customer must call up the following URL - YOURDOMAIN.de/otobo/customer.pl.

If you have forgotten your password for the customer portal, click on “Forgot password?”. A Email with a link will then be sent; after clicking on this link, you will receive a second Email with your new password. You can enable or disable this “forgot password” function via the System Configuration “CustomerPanel LostPassword”. Via the settings CustomerPanel BodyLost Password as well as the configuration “CustomerPanel BodyLost PasswordToken”, you can change the Email with the password link and the Email with the password.
Changing the Customer Portal Logo
Section titled “Changing the Customer Portal Logo”
To change the image displayed at the Customer portal login, you must change the URL in the system configuration Customer Login::Settings.

There, you can change which image is selected using the “Background” setting. Both a URL to an image file and a path to the image on the server are possible. With “LoginText”, you can change the text displayed in the customer portal.
::: info
Currently, it is not that easy to adapt the agent area to your own CI. Changes to the OTOBO .css files would be necessary here. An exception is the logo on the agent login page and the agent header. The Logos can be easily exchanged by copying the Logos to the server and then adjusting the options AgentLoginLogo and AgentLogo under Admin -> System Configuration.
:::
Dashboard of the OTOBO Customer Portal
Section titled “Dashboard of the OTOBO Customer Portal”After you have logged into the OTOBO customer portal, you will land on the dashboard of the OTOBO customer portal.

Dashboard of the customer portal
There you can view your latest Tickets, as well as links to external tools. Via the Create Ticket field, you can create a new ticket.
Changing Colors
Section titled “Changing Colors”To change the colors for the OTOBO customer interface, please go to
Admin -> System Configuration and change the following settings:
-
CustomerColorDefinitions
-
To change the colors on the customer dashboard, please go to
Admin -> System Configurationand search for CustomerDashboard. In the search result, you will find all necessary options with color definitions.
Changing Images and Text
Section titled “Changing Images and Text”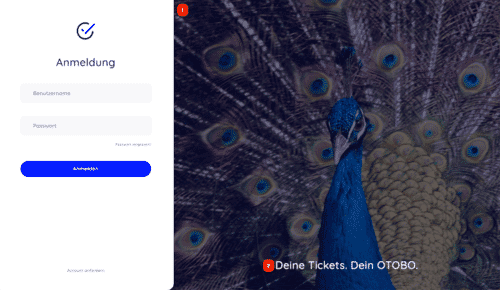
With the OTOBO Skins and Themes, you can customize the design of the entire helpdesk.
- 1 and 2 - System configuration option CustomerLogin::Settings
Removing Opacity and Watermark
Currently, it is not possible to remove the overlay and the watermark used in the right image via system configuration. To remove the opacity, please adjust the option #oooLoginBG > .oooBG in the file
var/httpd/htdocs/skins/Customer/default/css/Core.Login.css
#oooLoginBG > .oooBG {  position: relative;
  width: 100%;
  height: 100%;
  /* opacity: 0.45; deactivate opacity */
  background-size: cover;
  overflow: hidden;}
To remove the watermark, please delete the following line in the
file:
Kernel/Output/HTML/Templates/shared/CustomerLogin.tt
<!-- start login -->
<div id="oooLoginBG">
  <div class="oooBG" style="background-image: url([% Data.Background | html %]);">
    # remove this line ->    <div id="oooBGSignet" style="background-image: url([% Config(" Frontend::WebPath    ") %]common/img/otobo-signet_border.svg);">  </div>
  < /div>
  <h1>[% Translate(Data.LoginText) | html %]</h1>
</div>
::: info
Please add the files to an opm package in the next step so that the changes remain persistent. :::
Changing the tiles and options of the customer dashboard
To change the colors on the customer dashboard, please go to
Admin -> System Configuration and search for CustomerDashboard.
In the search result, you will find all required options with color definitions.
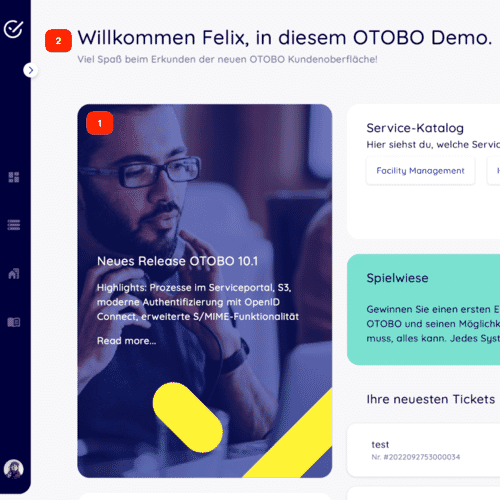
-
1 - To change the image, link, and text, please use the system configuration option CustomerDashboard::Tiles###FeaturedLink-01
-
2 - To change the top-level text, please use the system configuration option CustomerDashboard::Configuration::Text
::: info
Please deactivate the configuration options for tiles that are not needed.
:::
Modifying the Customer Portal Dashboard
Section titled “Modifying the Customer Portal Dashboard”You can change the appearance of the OTOBO dashboard in the System Configurations of the agent portal. These configurations are located at the following place:
Frontend -> Customer -> ModelRegistration
All navigation elements are defined there.

In the setting CustomerFrontend::Navigation###CustomerDashboard###002-CustomerDashboard, the top navigation element is defined. With the priority, you can change the order of the navigation elements. Smaller ones come first. With the svgIcon, you can change the displayed pictogram. With the Description, the hover text is defined. With Group and GroupRo, you could switch off menu items for certain customer users.
With the setting CustomerDashboard::Configuration::Text, the page heading as well as the greeting text can be changed.
Via the tiles in the configuration path Frontend -> Customer -> View -> Dashboard -> Tiles, the elements of the dashboard can be changed. The following tiles exist in the standard case:
CustomerDashboard::Tiles###PlainPicture-01defines the image on the dashboard (the one at the very bottom “Overview”; you could exchange the displayed image)CustomerDashboard::Tiles###PlainText-01- creates a tile that displays text. By default, this says “Hello World”CustomerDashboard::Tiles###NewTicket- is a button for creating a ticket. The color of the text can be setCustomerDashboard::Tiles###FeaturedLink-01- shows the image with the text “Thats new in OTOBO”, background image, link, and text can be changed.CustomerDashboard::Tiles###TicketList-01- shows the list of the latest tickets; the order, number of Tickets, and more can be changedCustomerDashboard::Tiles###ToolBox-01- displays icons with links
Creating a Ticket in the OTOBO Customer Portal
Section titled “Creating a Ticket in the OTOBO Customer Portal”In the ticket creation mask, you can define various attributes. You can change the fields of the ticket creation in the Admin area.

Fields of ticket creation:
Section titled “Fields of ticket creation:”- Type: The type of Ticket - e.g., Problem or Question
- To: The Queue in which the ticket should be created
- Subject: The heading of the ticket
- Text: Description of the ticket
- Files: Files can be uploaded and attached to the ticket there
- Priority: How important solving the Ticket is
Customer Portal Ticket Information
Section titled “Customer Portal Ticket Information”
After clicking on a ticket, you can see all articles (subject, messages). In the System Configuration, you can set which attributes are displayed in this table.

If a field is set to 1, it will be displayed. To add Dynamic Fields to the view, you must add this field to the dynamic fields interface - Ticket::Frontend::CustomerTicketZoom
Editing Tickets in the Customer Portal
Section titled “Editing Tickets in the Customer Portal”Of course, you can also edit existing Tickets. To do this, select a specific ticket and then choose Reply; you can then write a reply to the ticket.

You can then add a message to the ticket, as well as set a new status for the Ticket.
Changing Settings in the Customer Portal
Section titled “Changing Settings in the Customer Portal”
In the Otobo customer portal, the customer user can change their personal settings; to do this, they must move the mouse over the avatar located at the bottom left and then press the gear icon. In the settings, the language, password, number of displayed Tickets, and ticket update can be changed.
Customizing the OTOBO Customer Portal
Section titled “Customizing the OTOBO Customer Portal”There are several customization options for the OTOBO customer portal, which can be accessed via the Admin area of the agent portal. The customization options can be found in the system configurations. There, under Frontend -> Customer.

Setting Options
Section titled “Setting Options”- CustomerFrontend::Active - switches the customer portal off or on.
- CustomerPanel CreateAccount - gives Customers the possibility to create an account themselves
- CustomerPanel LostPassword - switches the forgot password function on
- Customer Logo - sets the Logo used in the customer portal
- CustomerPanel BodyLostPassword - sets the message that the newly set password has
- CustomerPanel BodyLost PasswordToken - sets the sent message that is sent when someone has clicked on the “Forgot password” button
- CustomerPanel Body NewAccount - sets the message that new users of the Otobo ticket system receive
- Customer PanelCreate Account::MailRestrictions::Blacklist - forbids users with certain Emails from creating an account - all Emails that fulfill this regular expression are forbidden
- CustomerPanel CreateAccount::MailRestrictions::Whitelist - if activated, only Users whose Email account fulfills this regular expression can create an account
- Customer PanelLogin URL - sets the URL of the customer portal login
Additional Fields when Creating a Ticket in the Customer Portal
Section titled “Additional Fields when Creating a Ticket in the Customer Portal”
You have the possibility to add further fields to the ticket creation mask. This is done via dynamic fields; there are the following types of dynamic fields:
- Checkbox
- Contact data
- Database
- Date
- Date / Time
- Dropdown
- Multiselect
- Text
- Text area
- Title
- Webservice
You can select one of these types there, then you can define the settings of the field. If you add a text field, you can define the name, label, field order, tooltip text, number of lines, number of columns, default value, and whether you want to check the input for correctness with a regular expression.
After the field has been created, we still have to define in which interfaces the field should be displayed; for this, we go to the tile “Dynamic Fields Interfaces”.