OTOBO - POP3 and IMAP OAuth2 Authentication
OTOBO - POP3 and IMAP OAuth2 Authentication
Section titled “OTOBO - POP3 and IMAP OAuth2 Authentication”OTOBO now also supports authentication via OAuth2 / OpenID Connect for POP3 and IMAP, which enables a secure and modern method of authentication. After installation of the MailAccount-OAuth2 package, you can use this authentication method, which is particularly recommended when using cloud-based email services such as Microsoft Azure.
Azure Configuration Steps
Section titled “Azure Configuration Steps”- Visit the Azure Portal to start your Azure Active Directory configuration.
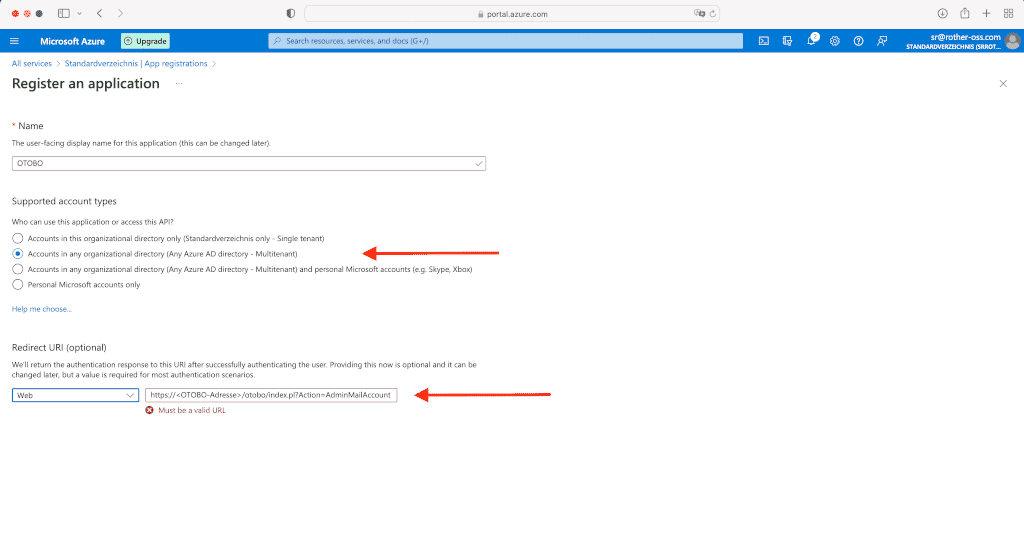
- Add a new enterprise application and create your own application.
- Assign a name to your app and configure it according to your requirements.
- The mailbox user must be assigned to the application. Note the application ID for later use in OTOBO.
- Determine the tenant ID of your domain, which is also required for the configuration in OTOBO.
- Create a new app in the app registration to complete the authentication process.
![Azure configuration for OTOBO [1]](https://softoft.sirv.com/Images/otobo/docs/oauth2-001)
By integrating modern authentication standards like OAuth2 into OTOBO, you improve the security and flexibility of your email communication. Furthermore, the clear structure of email account management in OTOBO facilitates an efficient and user-friendly configuration of your email settings to optimize your customer support and internal communication.
OAuth2 Authentication for POP3 and IMAP in OTOBO
Section titled “OAuth2 Authentication for POP3 and IMAP in OTOBO”OTOBO enables highly secure OAuth2 authentication for POP3 and IMAP email accounts through integration with Microsoft Azure, which represents a significant improvement in the security and efficiency of email communication.
Setting up OAuth2 authentication involves several steps in the Azure console and the OTOBO system configuration.
Steps to Set Up Azure for OAuth2 Authentication
Section titled “Steps to Set Up Azure for OAuth2 Authentication”-
Redirect URL and Client Secret
Create a redirect URL of the type Web for your application. The redirect URL should include the address of your OTOBO system, followed by “/otobo/index.pl?Action=AdminMailAccount”.
Azure step for creating the redirect URL [1] https://<OTOBO-address>/otobo/index.pl?Action=AdminMailAccountAlso, create a client secret and note its value, as it will be required later in OTOBO.
-
API Permissions
Add the required API permissions for
IMAP.AccessAsUser.AllandPOP.AccessAsUser.All. This grants OTOBO the necessary rights to access your email accounts.
![Create client secret in Azure [1]](https://softoft.sirv.com/Images/otobo/docs/oauth2-009)
![Add API permissions [1]](https://softoft.sirv.com/Images/otobo/docs/oauth2-010)
OTOBO OAuth2 Configuration
Section titled “OTOBO OAuth2 Configuration”After completing the Azure configuration, it is necessary to apply the settings in OTOBO:
-
Activation of the OAuth2 Profile
Navigate in the OTOBO admin interface to System Configuration and activate the profile
OAuth2::MailAccount::Profiles###Custom1. -
Entry of the Application ID and Client Secret
Enter the previously noted application/client ID and the client secret in the corresponding fields.
-
Adjustment of the OAuth2 Provider
In the configuration
OAuth2::MailAccount::Providers###MicrosoftAzure, replace the placeholder common with your TenantID.Once these configurations have been made, you can select the OAuth2 profile for your email accounts in OTOBO to complete the authentication.
![OAuth2 settings in OTOBO [1]](https://softoft.sirv.com/Images/otobo/docs/oauth2-012)
![Adjust OAuth2 provider [1]](https://softoft.sirv.com/Images/otobo/docs/oauth2-013)
![Adjust PostMaster Mail Account in OTOBO [1]](https://softoft.sirv.com/Images/otobo/docs/oauth2-014)
In summary, OAuth2 authentication and the use of Postmaster filters significantly improve the security and efficiency of email processing in OTOBO. With these features, OTOBO offers a powerful platform for optimizing communication with customers and within the team.