OTOBO Installation with Docker Compose
Installing OTOBO with Docker Compose is the recommended method for production environments. The official otobo-docker stack bundles every required service (web server, database, Elasticsearch, Redis and optionally Nginx for HTTPS), so you can have OTOBO up and running within minutes on any Linux distribution that supports Docker.
System requirements
Section titled “System requirements”| Component | Minimum | Recommended (production) |
|---|---|---|
| CPU | 2 cores | 4+ cores |
| RAM | 4 GB | 8 GB or more |
| Disk | 20 GB free | 40 GB+ (SSD) |
| Docker | 20.10 | latest version |
| Docker Compose | v2 | latest version |
| Git | 2.17 | latest version |
[!NOTE] Elasticsearch is part of the stack and requires a fair amount of memory. For production environments, plan for at least 8 GB of RAM.
Step 1: Install Docker, Docker Compose and Git
Section titled “Step 1: Install Docker, Docker Compose and Git”Install Docker and Docker Compose on your server. The exact commands depend on your Linux distribution:
On Windows or macOS, install Docker Desktop and enable WSL 2 integration (Windows). Then follow the steps below inside a terminal.
Verify the installation:
docker --versiondocker compose versionStep 2: Clone the OTOBO Docker repository
Section titled “Step 2: Clone the OTOBO Docker repository”The otobo-docker repository contains the Docker Compose configuration and helper scripts. Use the tag that matches the OTOBO version you want (e.g. rel-11_0 for the current 11.0 series).
cd /optsudo git clone https://github.com/RotherOSS/otobo-docker.git --branch rel-11_0 /opt/otobo-dockercd /opt/otobo-dockerls -a # sanity check: README.md and the .docker_compose_env_* files should be presentStep 3: Create the .env file
Section titled “Step 3: Create the .env file”The .env file is the central configuration file for your OTOBO installation. It is not created automatically; instead you copy it from one of the provided sample files:
.docker_compose_env_http– OTOBO over HTTP (simplest option, e.g. behind your own reverse proxy).docker_compose_env_https– OTOBO over HTTPS with the built-in Nginx reverse proxy
For a simple HTTP installation:
sudo cp -p .docker_compose_env_http .envFor HTTPS, use .docker_compose_env_https instead and provide a certificate (see Advanced installation).
Step 4: Set the database root password
Section titled “Step 4: Set the database root password”Open the .env file and set a secure password for the database administrator:
sudo nano .envAdjust the following line:
OTOBO_DB_ROOT_PASSWORD=<your_secure_password>You will need this password later in the web installer to create the database and the OTOBO schema.
Step 5: Start the containers
Section titled “Step 5: Start the containers”Start the whole stack in the background:
sudo docker compose up --detachOn first start the Docker images are downloaded from Docker Hub – depending on your connection this can take a few minutes.
Then verify that all services are running (five for HTTP, six for HTTPS):
sudo docker compose psStep 6: Complete the installation via the web installer
Section titled “Step 6: Complete the installation via the web installer”Open the OTOBO installer in your browser:
http://<your-server-ip>/otobo/installer.plFollow the installer steps and note the following:
- Choose a new MySQL/MariaDB database.
- As the database root password, use the value from
OTOBO_DB_ROOT_PASSWORD. - Leave the MySQL hostname set to
db– this is the internal service name of the database container.
When finished you can log in to the agent interface (default user root@localhost; the password is shown at the end of the installer).
After the installation
Section titled “After the installation”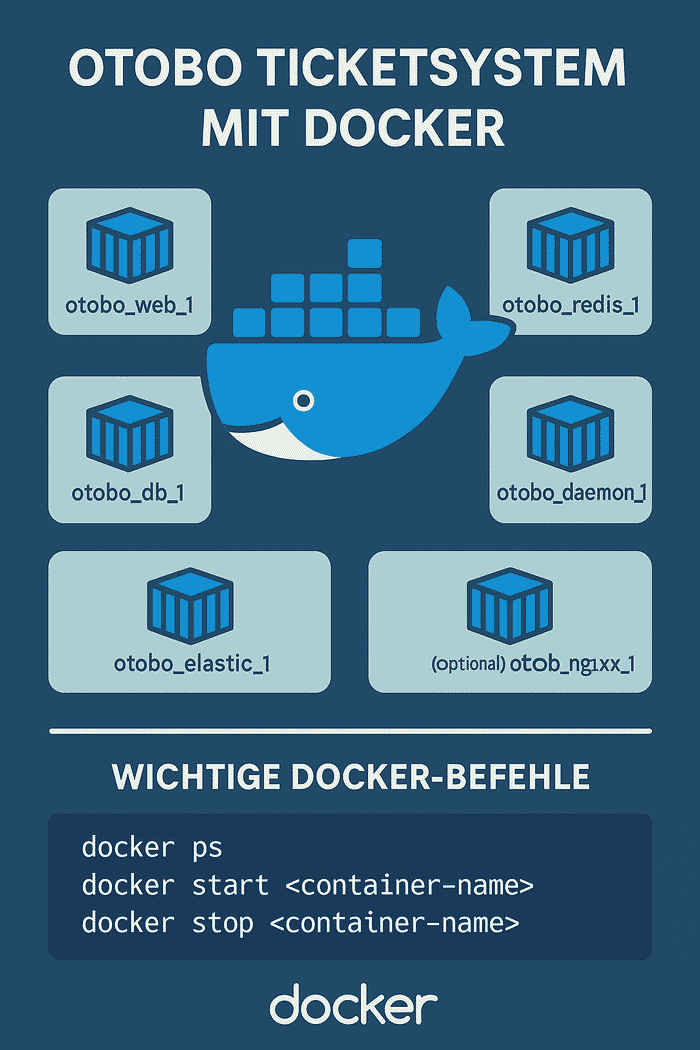
- Check the OTOBO daemon: the daemon container handles background tasks (email fetching, escalations, cron jobs). It runs as its own container and should be shown as “running”.
- Firewall: open the required ports (port 80 for HTTP or 443 for HTTPS).
- Enter the container (for CLI tasks):
sudo docker compose exec web bashTroubleshooting
Section titled “Troubleshooting”Elasticsearch does not start / the container exits immediately
Elasticsearch requires an increased vm.max_map_count value. Set it permanently:
sudo sysctl -w vm.max_map_count=262144echo "vm.max_map_count=262144" | sudo tee /etc/sysctl.d/99-otobo-elasticsearch.confPort 80 or 443 already in use
Set different ports in the .env file via OTOBO_WEB_HTTP_PORT or OTOBO_WEB_HTTPS_PORT and restart the stack.
View the logs of a service
sudo docker compose logs -f websudo docker compose logs -f elasticRestart or stop the stack
sudo docker compose restartsudo docker compose stopFurther topics
Section titled “Further topics”For HTTPS configuration, Nginx customization, environment variables, updates and backups, read the Advanced installation of OTOBO.
If you want to combine OTOBO with AI-powered ticket classification, see OTOBO AI & Open Ticket AI.
For professional support with installation or integration, please contact Softoft.de.
Frequently asked questions
What do I need before installing OTOBO with Docker Compose?
A supported Linux host with Docker, Docker Compose, and Git installed, plus enough CPU, RAM, and disk for the stack.
Where does the official OTOBO Docker Compose repository live?
Clone the official otobo-docker repository (typically into /opt/otobo-docker) and create a .env file from the provided template.
How do I finish setup after the containers are running?
Open the OTOBO web installer in your browser, complete the database and admin steps, then verify the services with docker compose ps.