
OTOBO Skins & Themes – Customize Agent Interface Design
In this guide: Change the OTOBO agent interface appearance with custom skins and CSS.
Related: Customer portal branding · OTOBO GUI overview · System configuration
It is possible to change the appearance of the OTOBO ticket system by creating a new skin.

Changing the OTOBO skin - theme setting
Section titled “Changing the OTOBO skin - theme setting”Every Agent can choose which skin they want to use. After the OTOBO installation, only the default skin is available. The OTOBO skin defines the design of the interface. In their personal settings, users can find the option to replace their current skin with another one.
Creating a new skin
Section titled “Creating a new skin”Changing CSS
Section titled “Changing CSS”If you have a Docker OTOBO installation, the agent skins are located here:
/var/lib/docker/volumes/otobo_opt_otobo/_data/var/httpd/htdocs/skins/Agent/For a non-Docker installation, the path is:
$OTOBO_HOME/var/httpd/htdocs/skins/Agent/$SKIN_NAME/New folder
Section titled “New folder”If no skin has been added yet, you will only find the “default” folder in this path. To add a new skin, you must first add a new folder. For example, “my_skin”.
Changing the design
Section titled “Changing the design”To change the design, you can create a “css” folder inside the “my_skin” folder. Skins work by always loading the standard CSS skin. In your own skin, you can then override the values from the standard skin. For example, by overriding CSS classes from the default skin:
CSS from the standard skin: Skin/default/Core.css
.Navigation { height: 100px;}You could, for example, override it with: /* Skin/my_skin/Core.css
.Navigation { height: 30px;}Afterwards, you need to create a configuration file in the folder $OTOBO-HOME/Kernel/Config/Files/XML/{skinName}.xml.
This should have the following structure:
<?xml version="1.0" encoding="utf-8" ?><otobo_config version="2.0" init="Changes">    <ConfigItem Name="AgentLogo" Required="0" Valid="1">        <Description Translatable="0">The logo shown in the header of the agent interface. The URL to the image must be            a relative URL to the skin image directory.        </Description>        <Group>Framework</Group>        <SubGroup>Frontend::Agent</SubGroup>        <Setting>            <Hash>                <Item Key="URL">                    https://softoft.de/Otobo_Wortmarke_Sub_Digital_Blau_156hoch-zugeschnitten-300x113.png                </Item>                <Item Key="StyleTop">13px</Item>                <Item Key="StyleRight">75px</Item>                <Item Key="StyleHeight">67px</Item>                <Item Key="StyleWidth">244px</Item>            </Hash>        </Setting>    </ConfigItem>
    <ConfigItem Name="Loader::Agent::Skin###001-softoftSkin" Required="0" Valid="1">        <Description Translatable="0"></Description>        <Group>Framework</Group>        <SubGroup>Frontend::Agent</SubGroup>        <Setting>            <Hash>                <Item Key="InternalName">softoftSkin</Item>                <Item Key="VisibleName">softoftSkin</Item>                <Item Key="Description"></Item>                <Item Key="HomePage"></Item>            </Hash>        </Setting>    </ConfigItem></otobo_config>
Available skins / themes
Section titled “Available skins / themes”There are already skins created by other companies.
OTOBO Dark Skin / Theme
Section titled “OTOBO Dark Skin / Theme”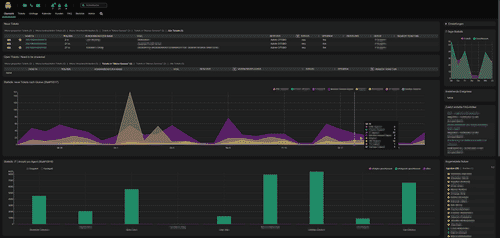
Link to the skin / theme: Github Dark Skin
Modern Skin / Theme by Efflux
Section titled “Modern Skin / Theme by Efflux”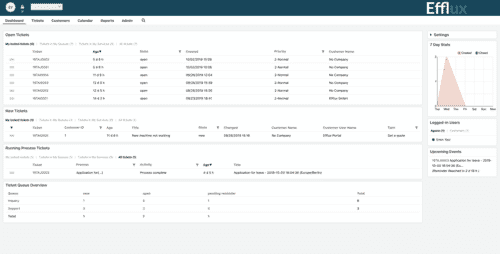
Github link to the skin / theme: Efflux Modern Skin
FAQ: OTOBO Skins & Themes
Section titled “FAQ: OTOBO Skins & Themes”Where are OTOBO agent skins stored?
Section titled “Where are OTOBO agent skins stored?”In a Docker install under /var/lib/docker/volumes/otobo_opt_otobo/_data/var/httpd/htdocs/skins/Agent/, otherwise under $OTOBO_HOME/var/httpd/htdocs/skins/Agent/$SKIN_NAME/.
How do I create a custom OTOBO skin?
Section titled “How do I create a custom OTOBO skin?”Add a new folder (e.g. my_skin) next to default, create a css folder inside it, and override the CSS classes you want to change. Register the skin via an XML config file under $OTOBO_HOME/Kernel/Config/Files/XML/{skinName}.xml.
Will my custom skin survive an OTOBO update?
Section titled “Will my custom skin survive an OTOBO update?”To make changes persistent, package your skin files into an OPM package rather than editing the live filesystem directly. This way the skin is reinstalled cleanly after updates.
Can each agent choose their own skin?
Section titled “Can each agent choose their own skin?”Yes. Every agent can select an available skin in their personal preferences. Newly installed skins appear there once registered via SysConfig.
Is there a dark theme for OTOBO?
Section titled “Is there a dark theme for OTOBO?”Yes — see the community OTOBO Dark Skin and the Efflux Modern Skin listed above.
Frequently asked questions
How do you change the OTOBO skin or theme?
Agents or admins select an available skin/theme; custom skins are created with CSS and registered for use in the agent interface.
What is needed to create a new OTOBO skin?
Create the skin folder structure, adjust CSS, and configure the skin so it appears as a selectable theme for agents.
Does OTOBO include a dark skin?
Yes. A dark skin/theme is among the available options discussed for the agent interface. Every Agent can choose which skin they want to use. After the OTOBO installation, only the default skin is available. The OTOBO skin defines the design of the interface. In their personal settings, users can find the…
What should I know about Changing CSS?
If you have a Docker OTOBO installation, the agent skins are located here: For a non-Docker installation, the path is: